
Design statements are an effective way to explain your design proposal and how it enhances the surrounding context and aligns with the design and planning requirements for the site and area. This section provides things to think about when preparing a design statement.
Design Statement Guidance
1. Introduction
Design statements are a tool to present the analysis and thinking behind the design of a development proposal. They use photographs, maps and diagrams, supported by written descriptions, to illustrate the rationale behind a development proposal, showing how it integrates with the development site and surroundings and how it responds to the visions and policies for the area.

Design statements allow clients to understand how the designer has responded to their brief in relation to the conditions of their site and the surrounding neighbourhood. They communicate how the tensions that exist on all sites have been balanced and resolved.
Design statements help to test and communicate the ideas that inform a development proposal and enables the design and development team to document and share the analysis and decision making that underpin the proposal. The key attributes of a site and the surrounding area, as well as other factors that have informed the development are clearly identified in the design statement, and the design decisions made in response to these attributes are clearly stated.
A design statement records the work of the design and development team. For many, this formalises a process already in place. For others, this prompts a closer look at the development in the context of its site and surrounding area.
A design statement typically consists of two parts – the site and context analysis and the design response. It is the documentation of the analysis that the designer will have undertaken to examine and understand the development site and its surroundings, and then the rationale for how the development proposal responds to this context.
As a tool to help support quality design outcomes and improve the efficiency and consistency of resource consent processes, Auckland Council promotes a five-part design statement model. The five components of a design statement explain:
- The findings of an analysis of the site and immediate surrounds
- The findings of a wider analysis of the neighbourhood as relevant to the site and development.
- The key components of the planning context.
- The key opportunities and constraints of the analysis.
- A summary of the proposal and how it responds to the context, opportunities and constraints.
The length and complexity of a design statement is generally reflective of the scale and complexity of the project, with a small residential development typically needing much less explanation than a large city-centre office block.
The first part of a design statement is broken down into site analysis, neighbourhood context, planning context and opportunities and constraints. The second part of a design statement, the Design statements design response, includes both conceptual and more detailed information on the design of the development proposal including site layout, floor plans, elevations, lane and street design and landscape and open space. This document assists design teams with preparing a design statement by giving guidance on what a design statement should contain.
The analysis presented in a design statement is undertaken prior to finalisation of a development proposal. The design statement is prepared by the development’s designer or, in the case of a large or complex site, the many disciplines that make up the design team.
Design statements are a valuable tool for the applicant/client, the designer and council for the following reasons:
- They encourage and support quality design outcomes including avoidance of environmental impacts and costs.
- They are an effective communication tool.
- They assist in streamlining the design and resource consent process.
Site responsive developments can also add value by capitalising on on-site features, such as views and water bodies. A well designed and integrated development will create a high level of on and off-site amenity, which typically achieves a higher economic value.
The specific benefits to a developer/applicant and their design team of a well-considered design statement will be to speed up the resource consent process and contribute to good communication and understanding between the applicant, council and the community. This is because the design statement should identify issues and potential constraints prior to commissioning a design that may prove controversial.
As a tool, a design statement communicates the rationale and implications of the design decisions made, which assists the council in reviewing the development proposal. In assessing a resource consent application, the council will consider whether the proposal has identified and responded to the unique characteristics of the site, and the future planned character as identified in the Unitary Plan.
Providing all this information in a single design statement reduces the need for the council to seek further information, as the rationale as to why design decisions have been made is clearly presented. Design statements also introduce a form of ‘self-check’ or ‘quality control’ to the design process. In preparing a design statement any inadequacies of the proposal will become apparent, enabling applicants to make changes or improvements before lodging their consent.
From a resource consent perspective the design statement document should be used to communicate the design proposal in pre-application meetings, as part of a resource consent application package of information, for presentations such as for the Auckland Urban Design Panel, and as part of evidence at Council hearings.
Design statements are recognised as best practice among many professional design and development teams and are used extensively within New Zealand and overseas. Auckland Council encourages the use of design statements for all development proposals.
2. Context analysis
Context analysis provides an analysis of the site, street and wider neighbourhood. It provides the key information that the proposal should respond to.
By visiting the site and reviewing desktop information online, you can learn about the site's natural form, the history of its development, key environmental attributes and any significant cultural values. A site analysis is fundamental to preparing a development proposal that sensitively responds to the site’s attributes.
Identify and record the characteristics of the site, including its natural and built features.
As a visual tool, a site analysis plan enables someone to quickly learn about the development site. The knowledge gathered when preparing a site analysis is crucial to the resulting development proposal.
- The analysis should demonstrate a thorough understanding of the characteristics and attributes of your development site, the adjacent properties and the street it is located on. The scale, complexity, and sensitivity of the development site should inform the level of detail you need to provide.
- A site analysis is typically presented as one A3 drawing (or several for complex sites) that is annotated with supporting text and photos.
- You can use symbols, colours and labels to add information to the map. Always remember to include a key, a north arrow and a scale bar to help others use the map.
- Supporting text can be used to elaborate on the information, such as descriptions of the type of fencing along the boundary, or the value of the stream to the property.
- A good site analysis plan explains:
- What elements of the site are valued.
- Where the buildings, windows and private open spaces are located on adjoining sites and how they interact with the subject site.
- Where there are views to, through or from the site that should be considered.
- Where the predominant wind and solar aspects are.
- What the topography of the site is like and where the solar aspect is.
- What the edge conditions on all boundaries are.
Streetscape character analysis is required for sites that adjoin the street and public spaces.
- It identifies the predominant character of the street and built form of at least three properties either side of the site and across the street. It should describe what the predominant streetscape character of the immediate area is.
- The analysis could include typical front yard setbacks, predominant building heights, consistent roof forms, materials, architectural features and articulation, boundary treatments and landscaping/greening elements.
- The analysis could also include elements that detract from the streetscape character including a predominance of parking in the front yard, walls/buildings without windows, high fences, and lack of greening.
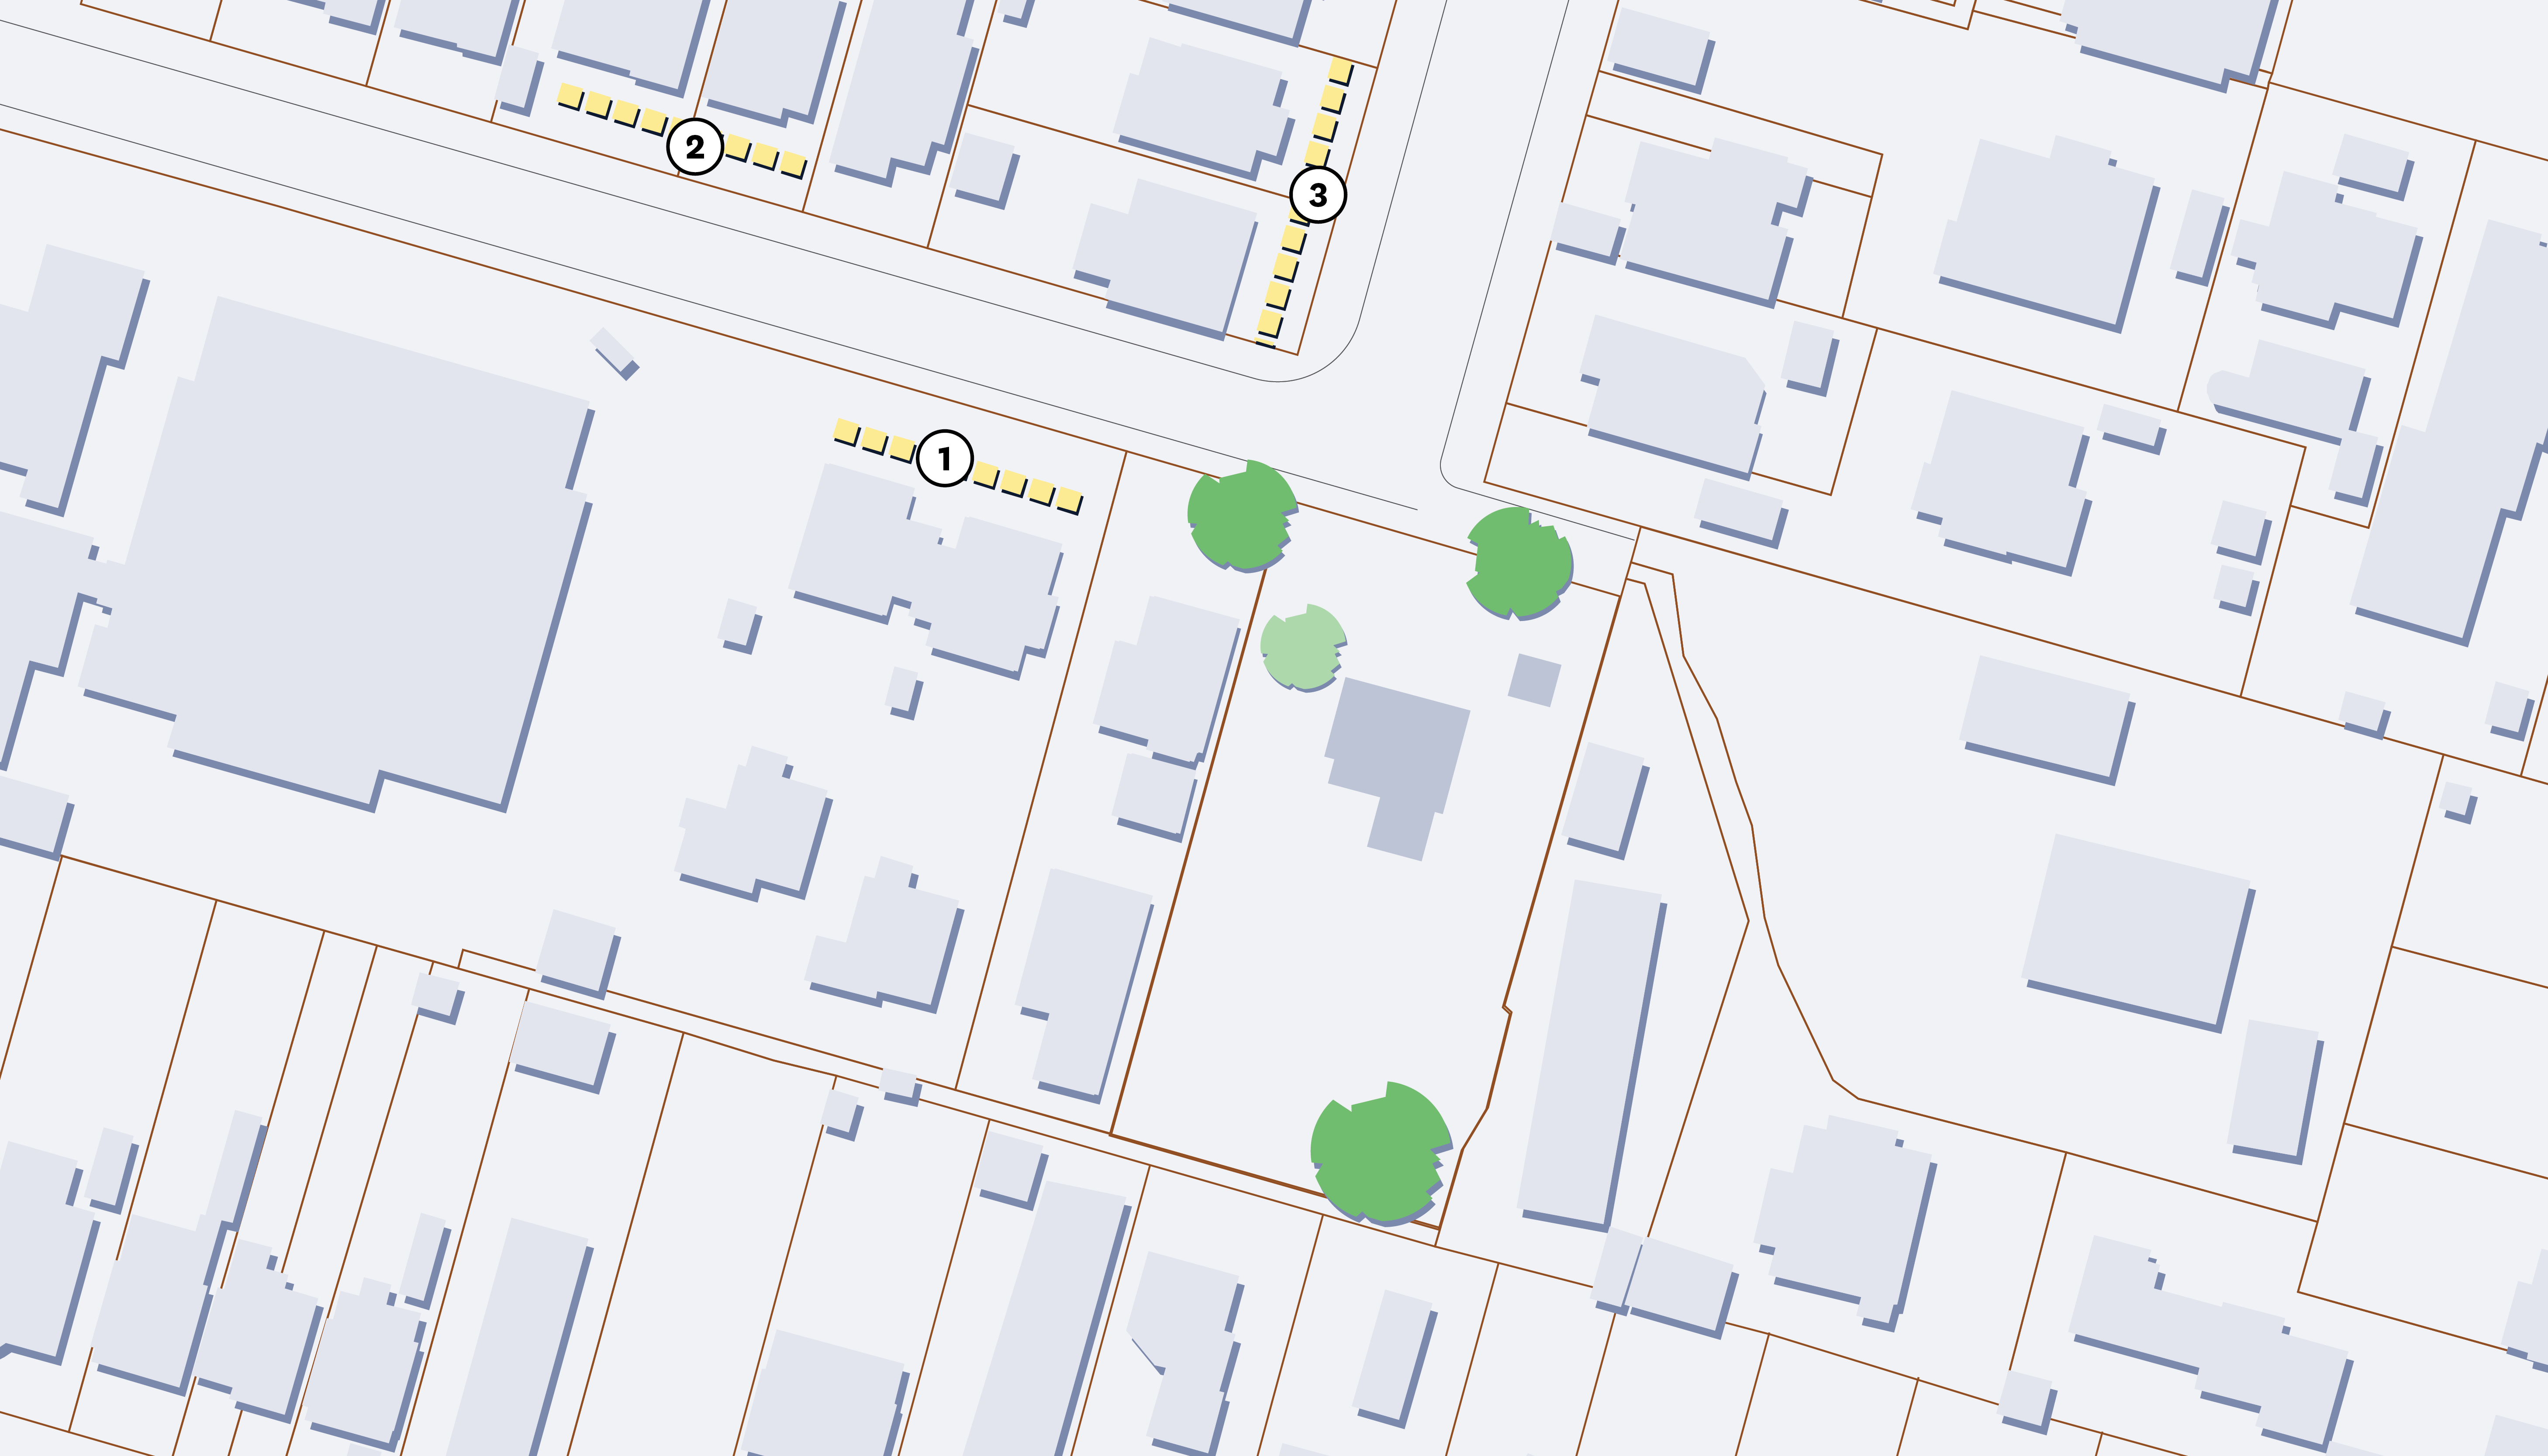
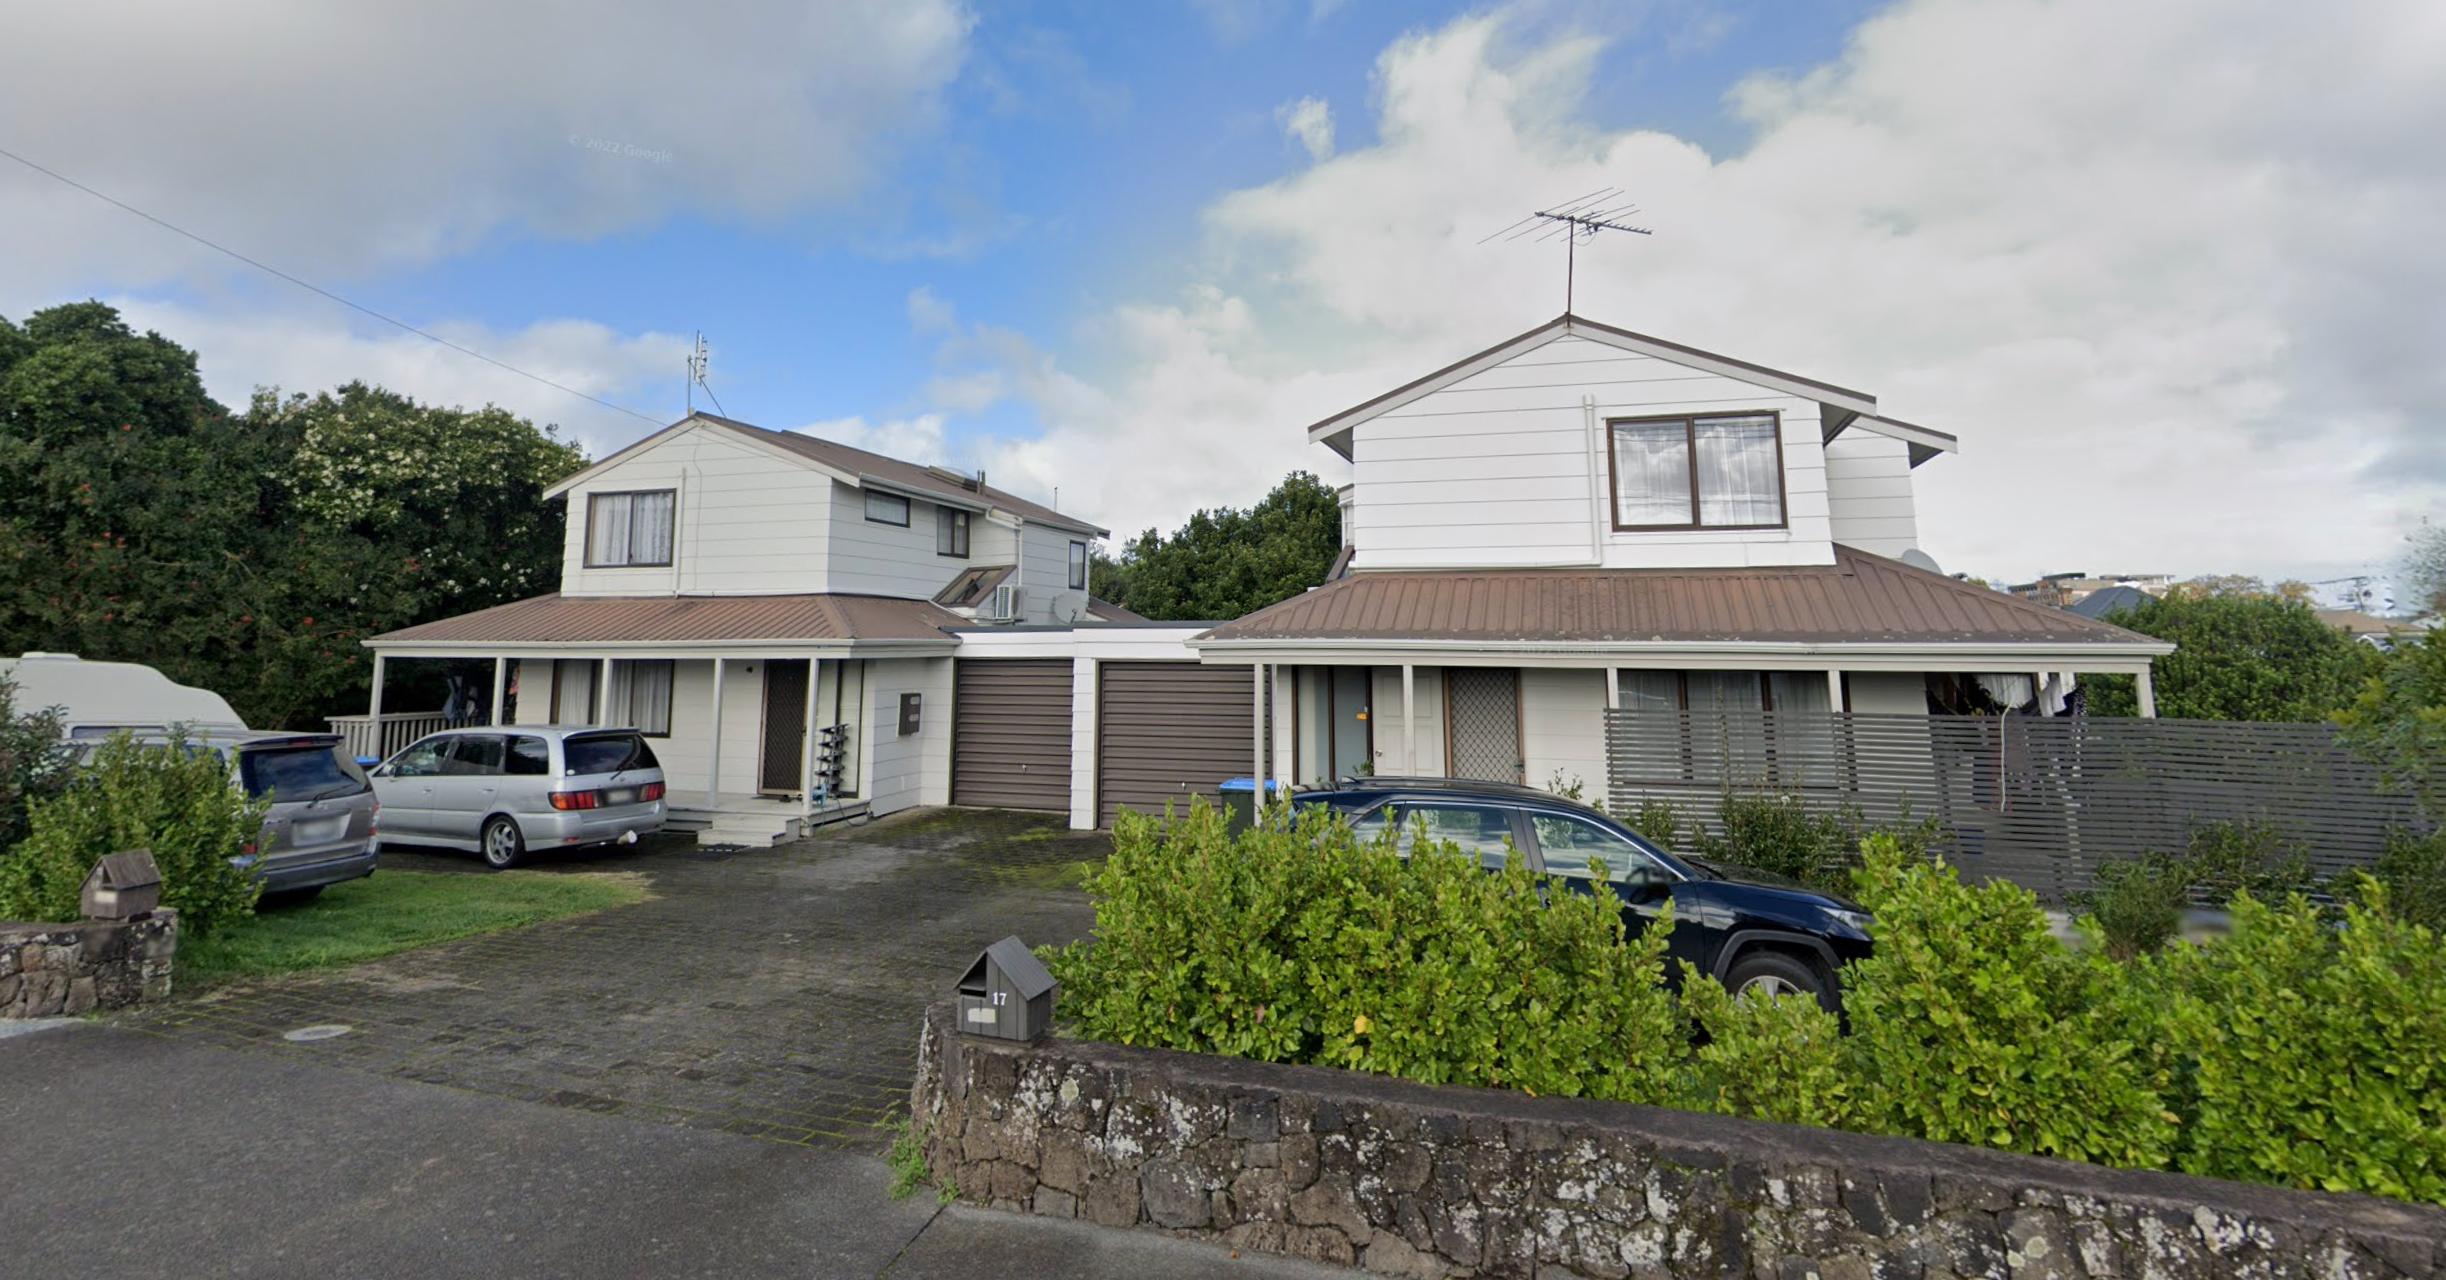
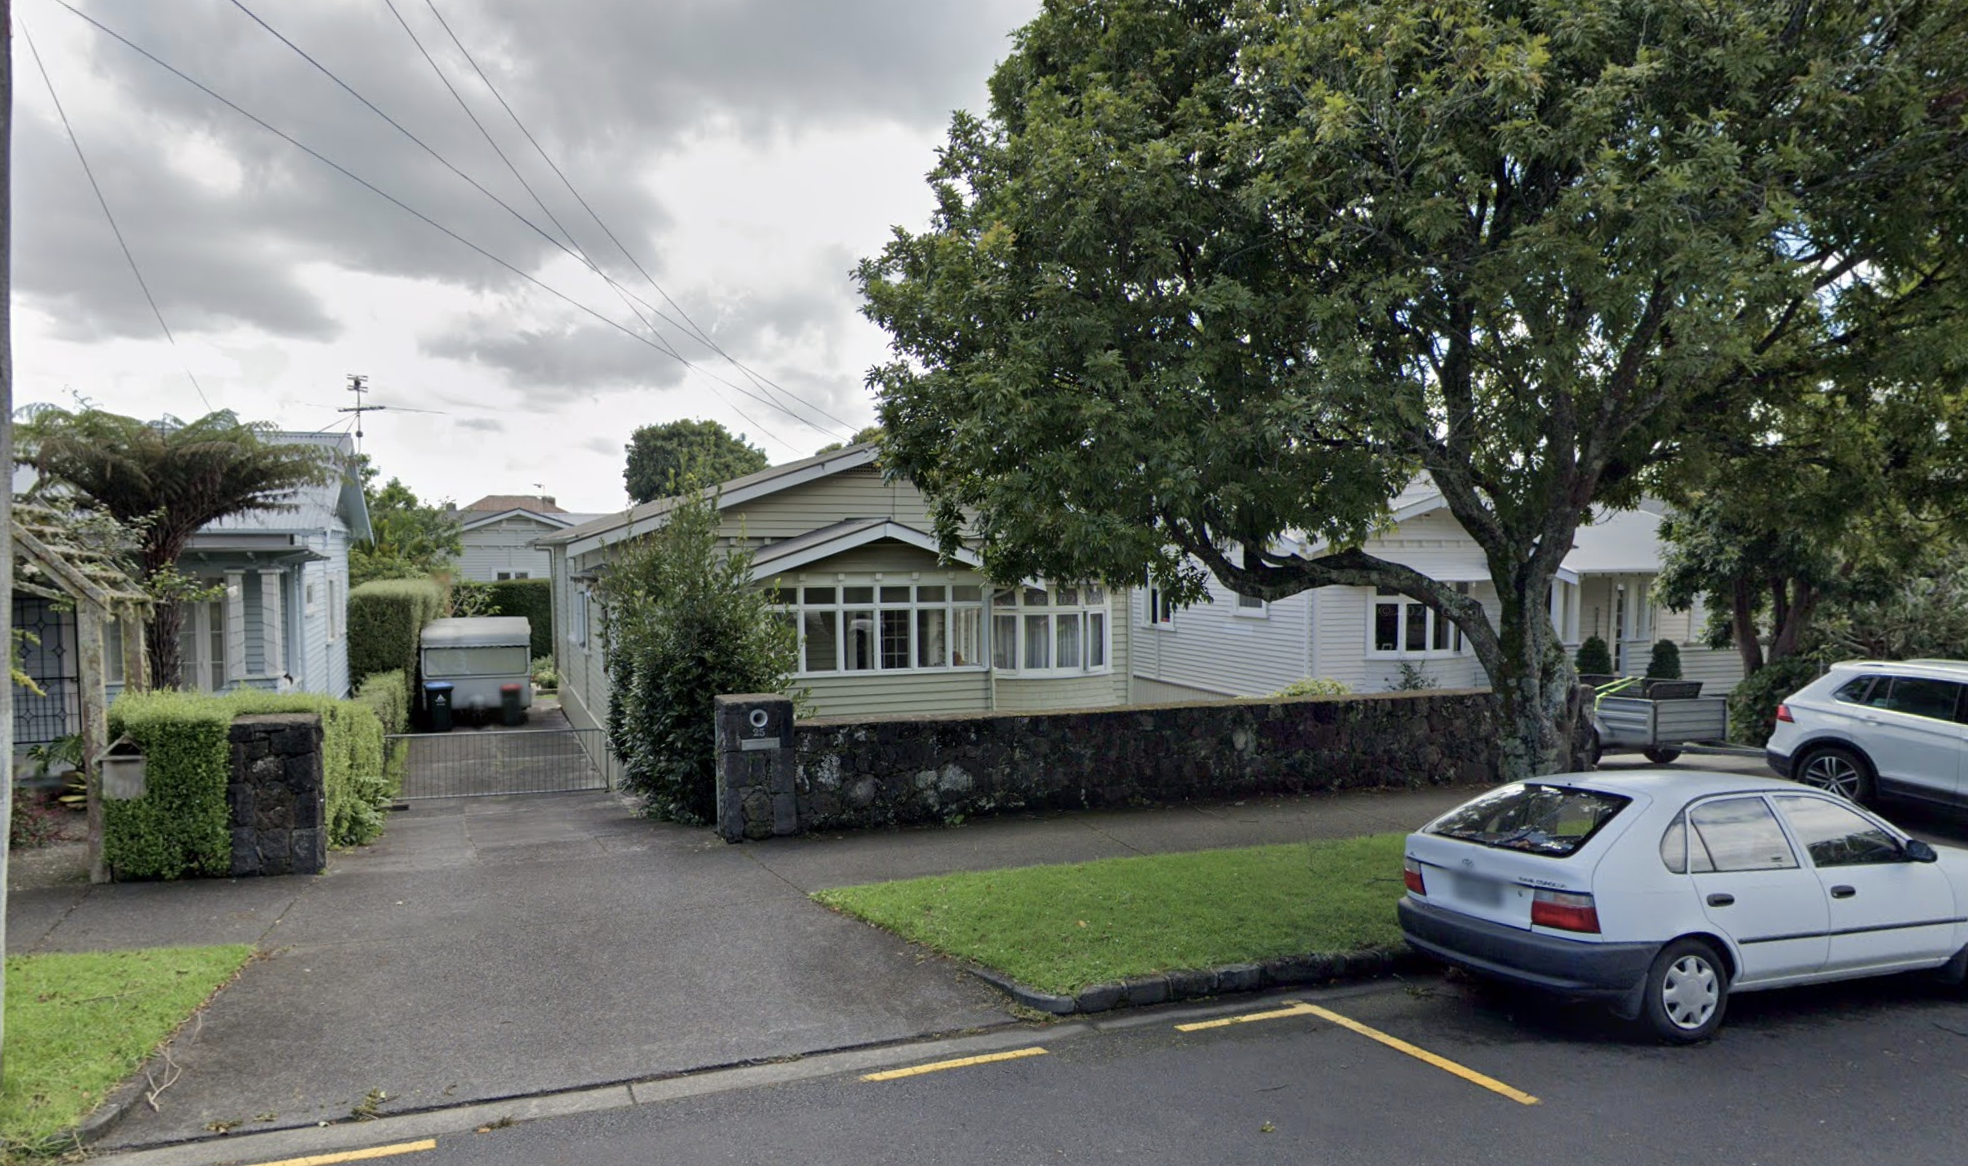
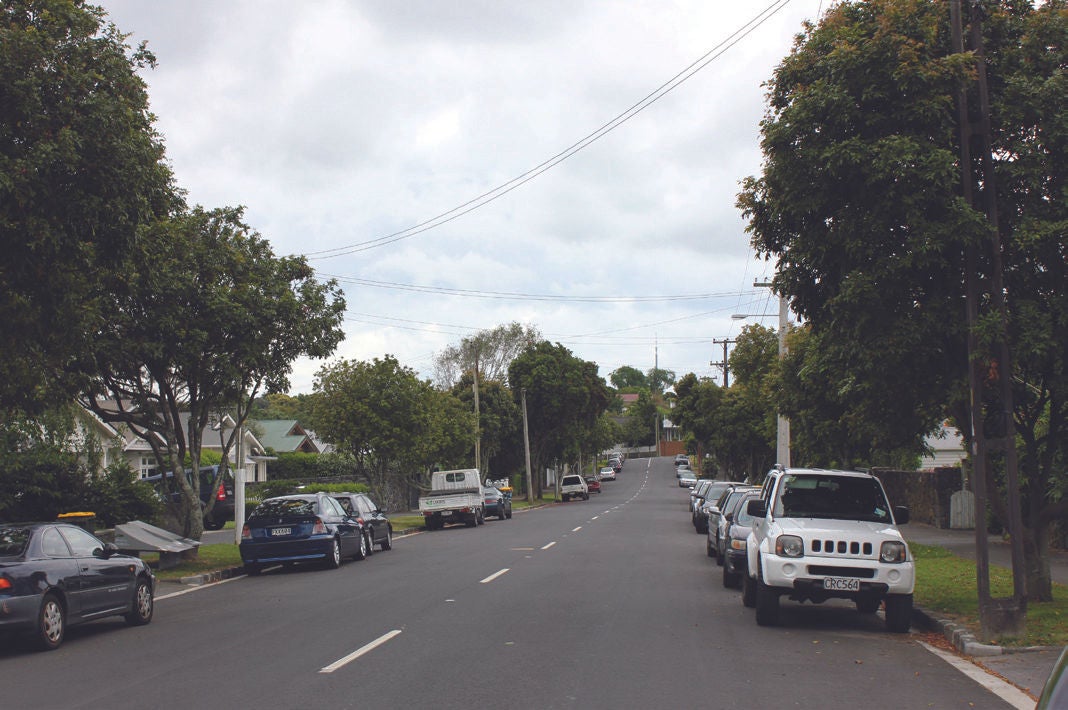
Show the location of buildings in the immediate neighbourhood that give the streetscape its character.
- A two storey semi-detached town house behind low stone walls is located on the neighbouring site to the west of the subject site. The timber weatherboard cladding and gable roof is consistent with the areas predominant bungalow architectural style.
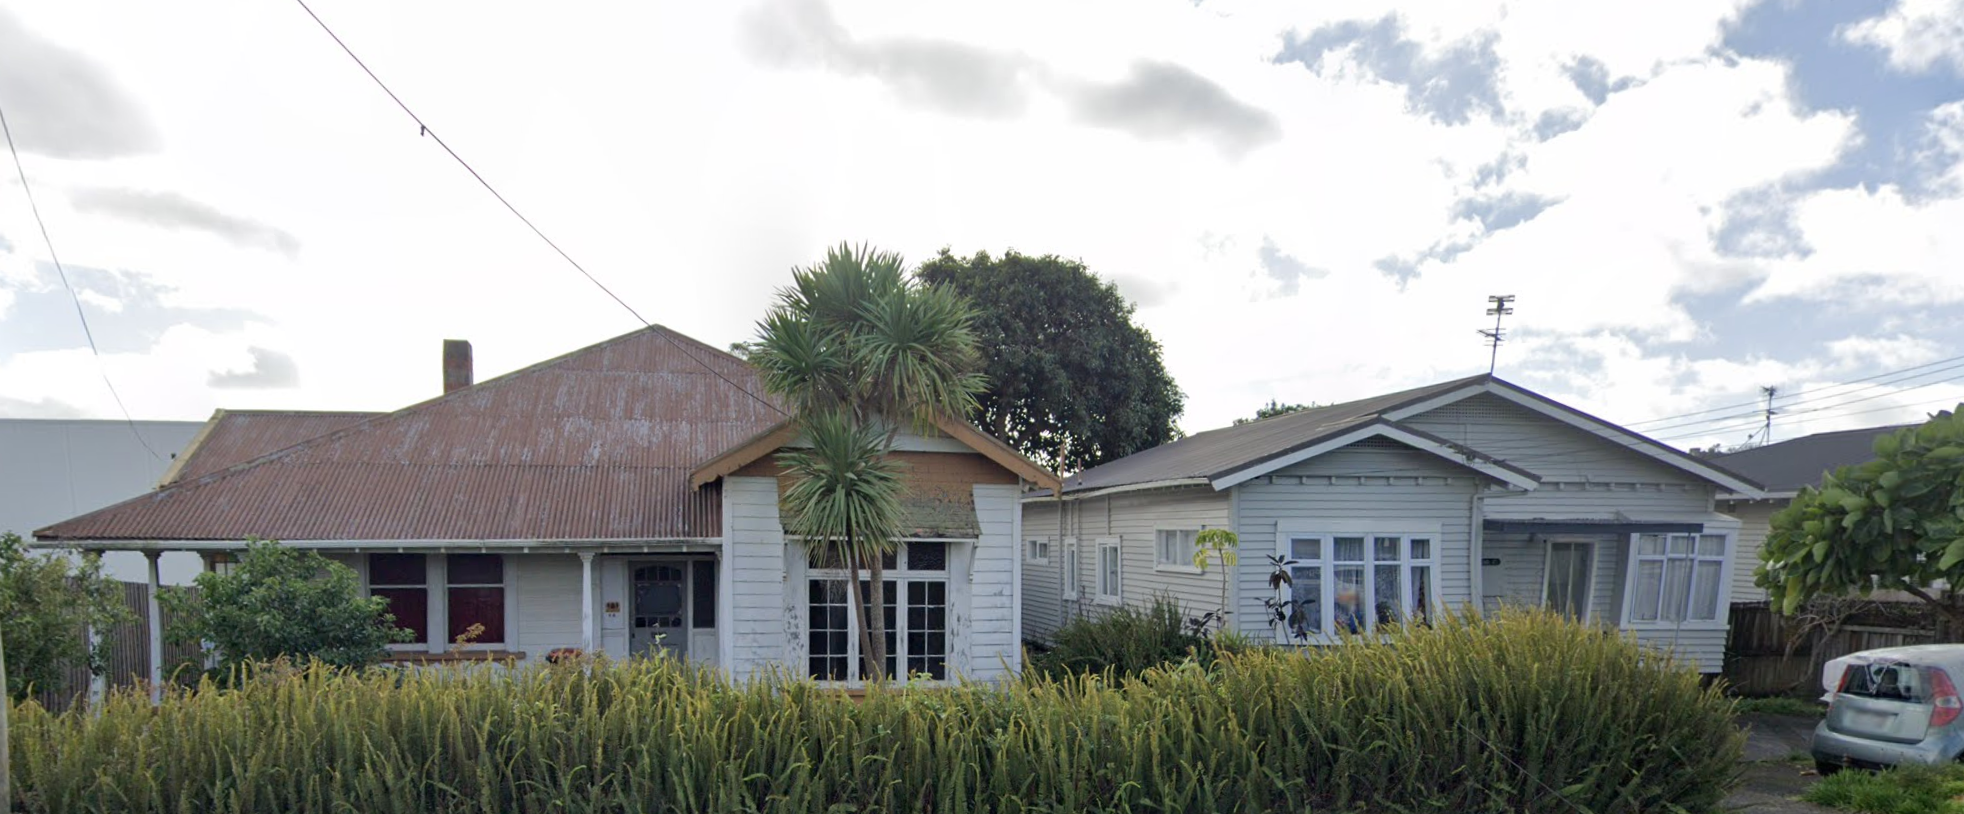
- Gable or hipped roofs with brick chimneys are a strong visual character in the street, and the roofs are generally coloured corrugated steel or tiled.
- The immediate neighbourhood predominantly includes Californian bungalows constructed with timber weatherboard cladding.
Site 1.
Site 2.
Site 3.
Understanding the key characteristics of your neighbourhood can help achieve more from your project and ensure that it responds appropriately to the surrounding neighbourhood.
Each project can have positive and negative impacts beyond the site boundaries, and the cumulative effect of developments in an area can influence the quality and enjoyment of a neighbourhood. A neighbourhood analysis enables the design and development team to fully understand the wider environment and community that the proposed development will be part of.
- The range and level of detail of the neighbourhood context analysis will be dependent on the scale and complexity of the project, and the scale and significance of the anticipated effects.
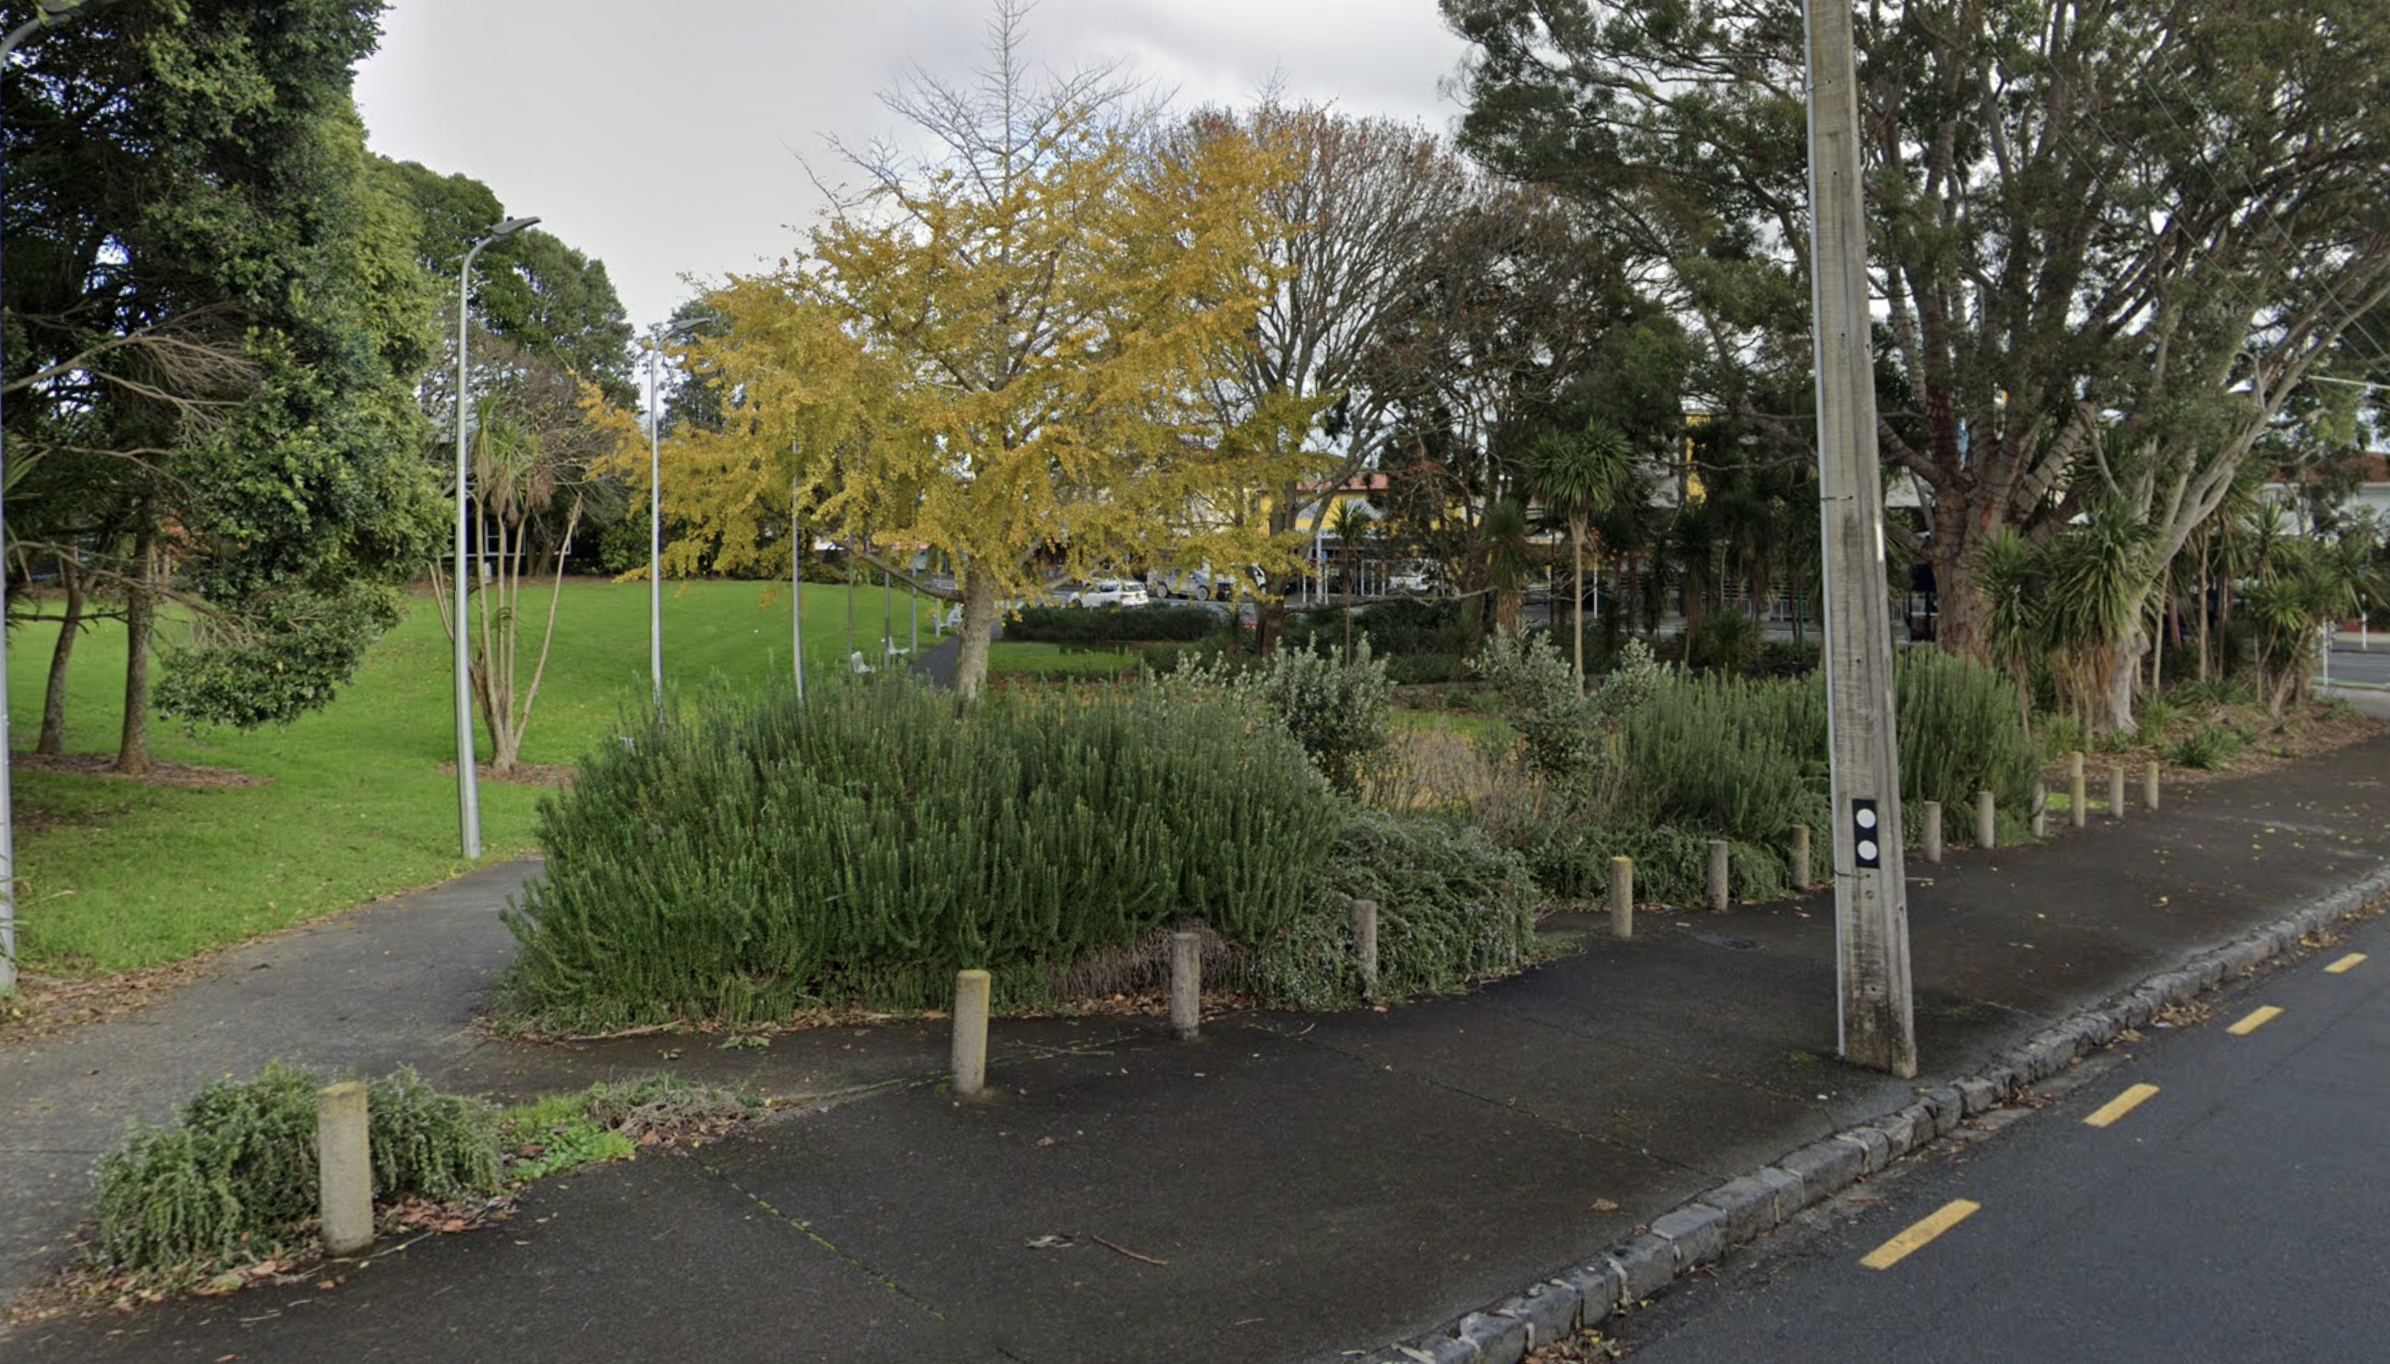
- It is important to define the extent of your neighbourhood. In some instances, this will relate to a suburb with clear boundaries. If less obvious, a 400m radius circle can be used. This equates to a five-minute walking distance, which is how far people will happily walk in order to meet their daily needs.
- The attributes of a neighbourhood can include landform and natural environment, street patterns, transport and movement, land use, built form character, and areas of cultural and historical significance.
- The result of a neighbourhood analysis is often one or two A3 pages, consisting of annotated maps, supporting text and a collection of photos.
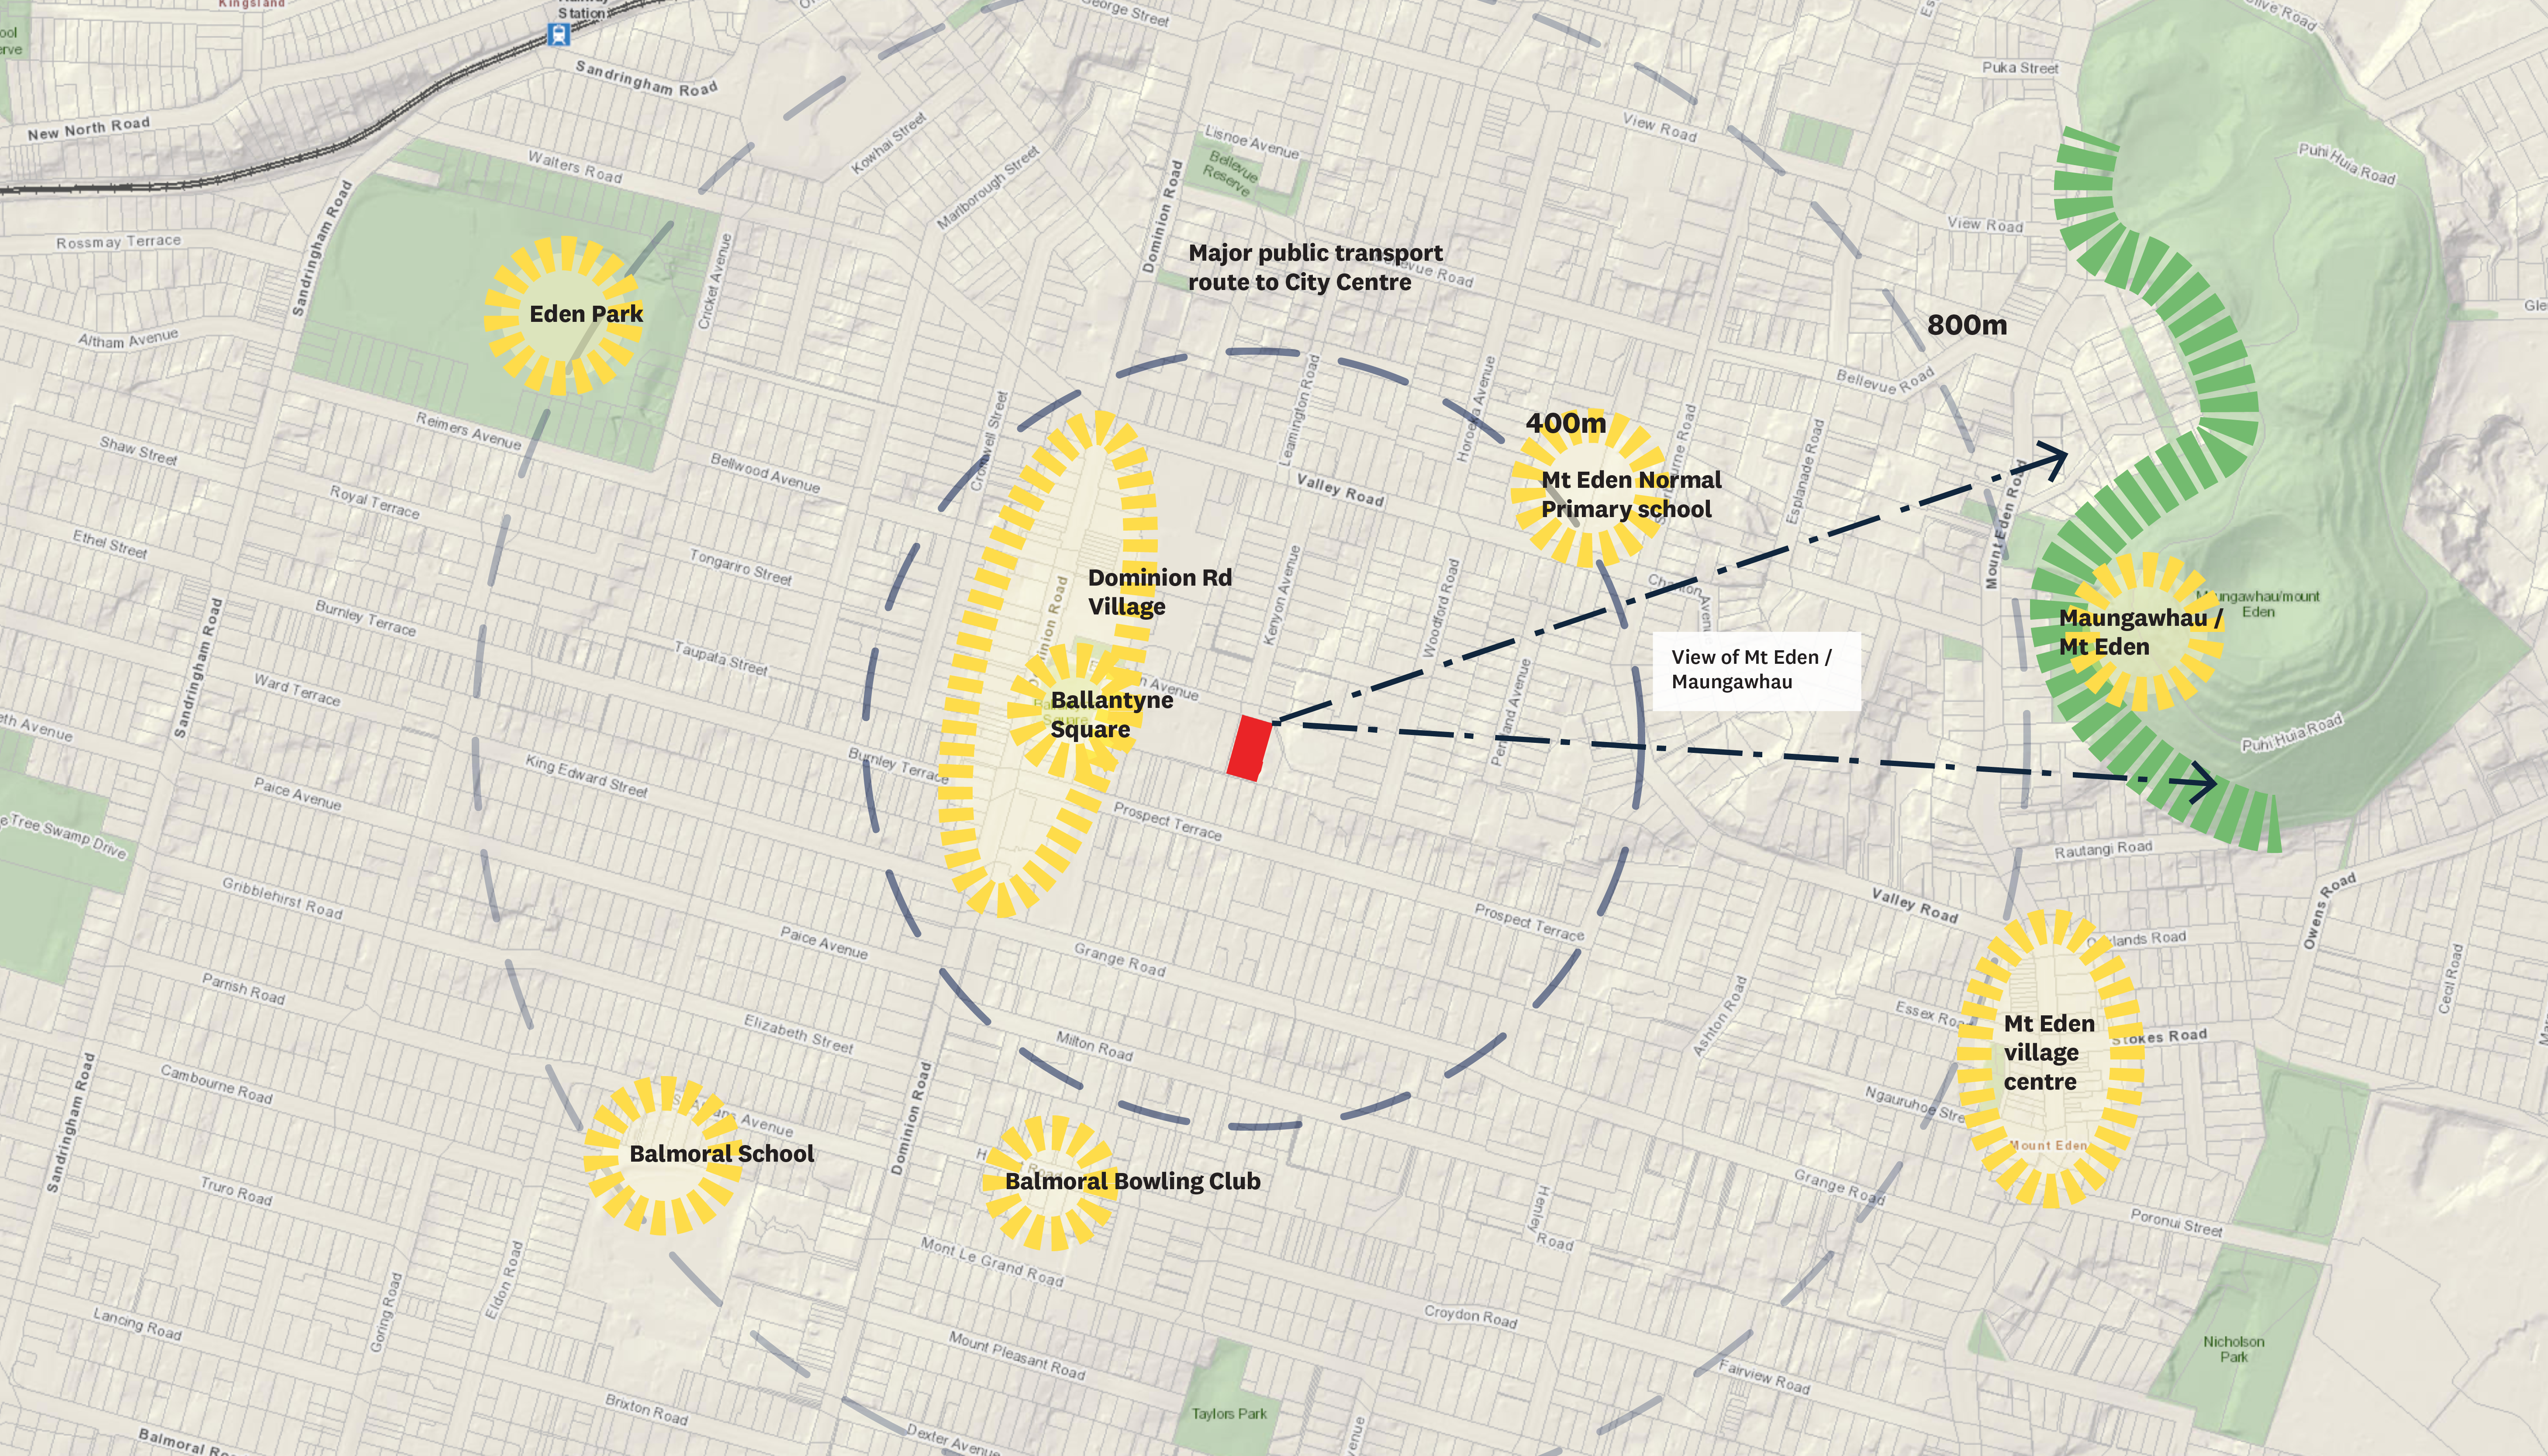
Identify the key characteristics that make up the neighbourhood including the natural and cultural environment, movement, built form character, urban structure and use & activity.
2.2.1 Natural and cultural environment
This analysis should identify which elements within the wider neighbourhood contribute to the amenity and character of the site. This should include:
- How the site fits into the broader landform including ridgelines, gullies, geological features etc, and what is the predominant landscape character – the layers that sit on top of the landform (e.g. vegetation - native or exotic, built environment etc).
- Where the public open spaces, green networks and biodiversity corridors in the neighbourhood are that the site can connect to or enhance.
- The location of watercourses, coastlines, floodplains or overland flow paths that affect the site, and that the site could connect to or enhance.
- The places of cultural importance and/or historic heritage are located and that could be used in the proposed design to reinforce local identity and character.
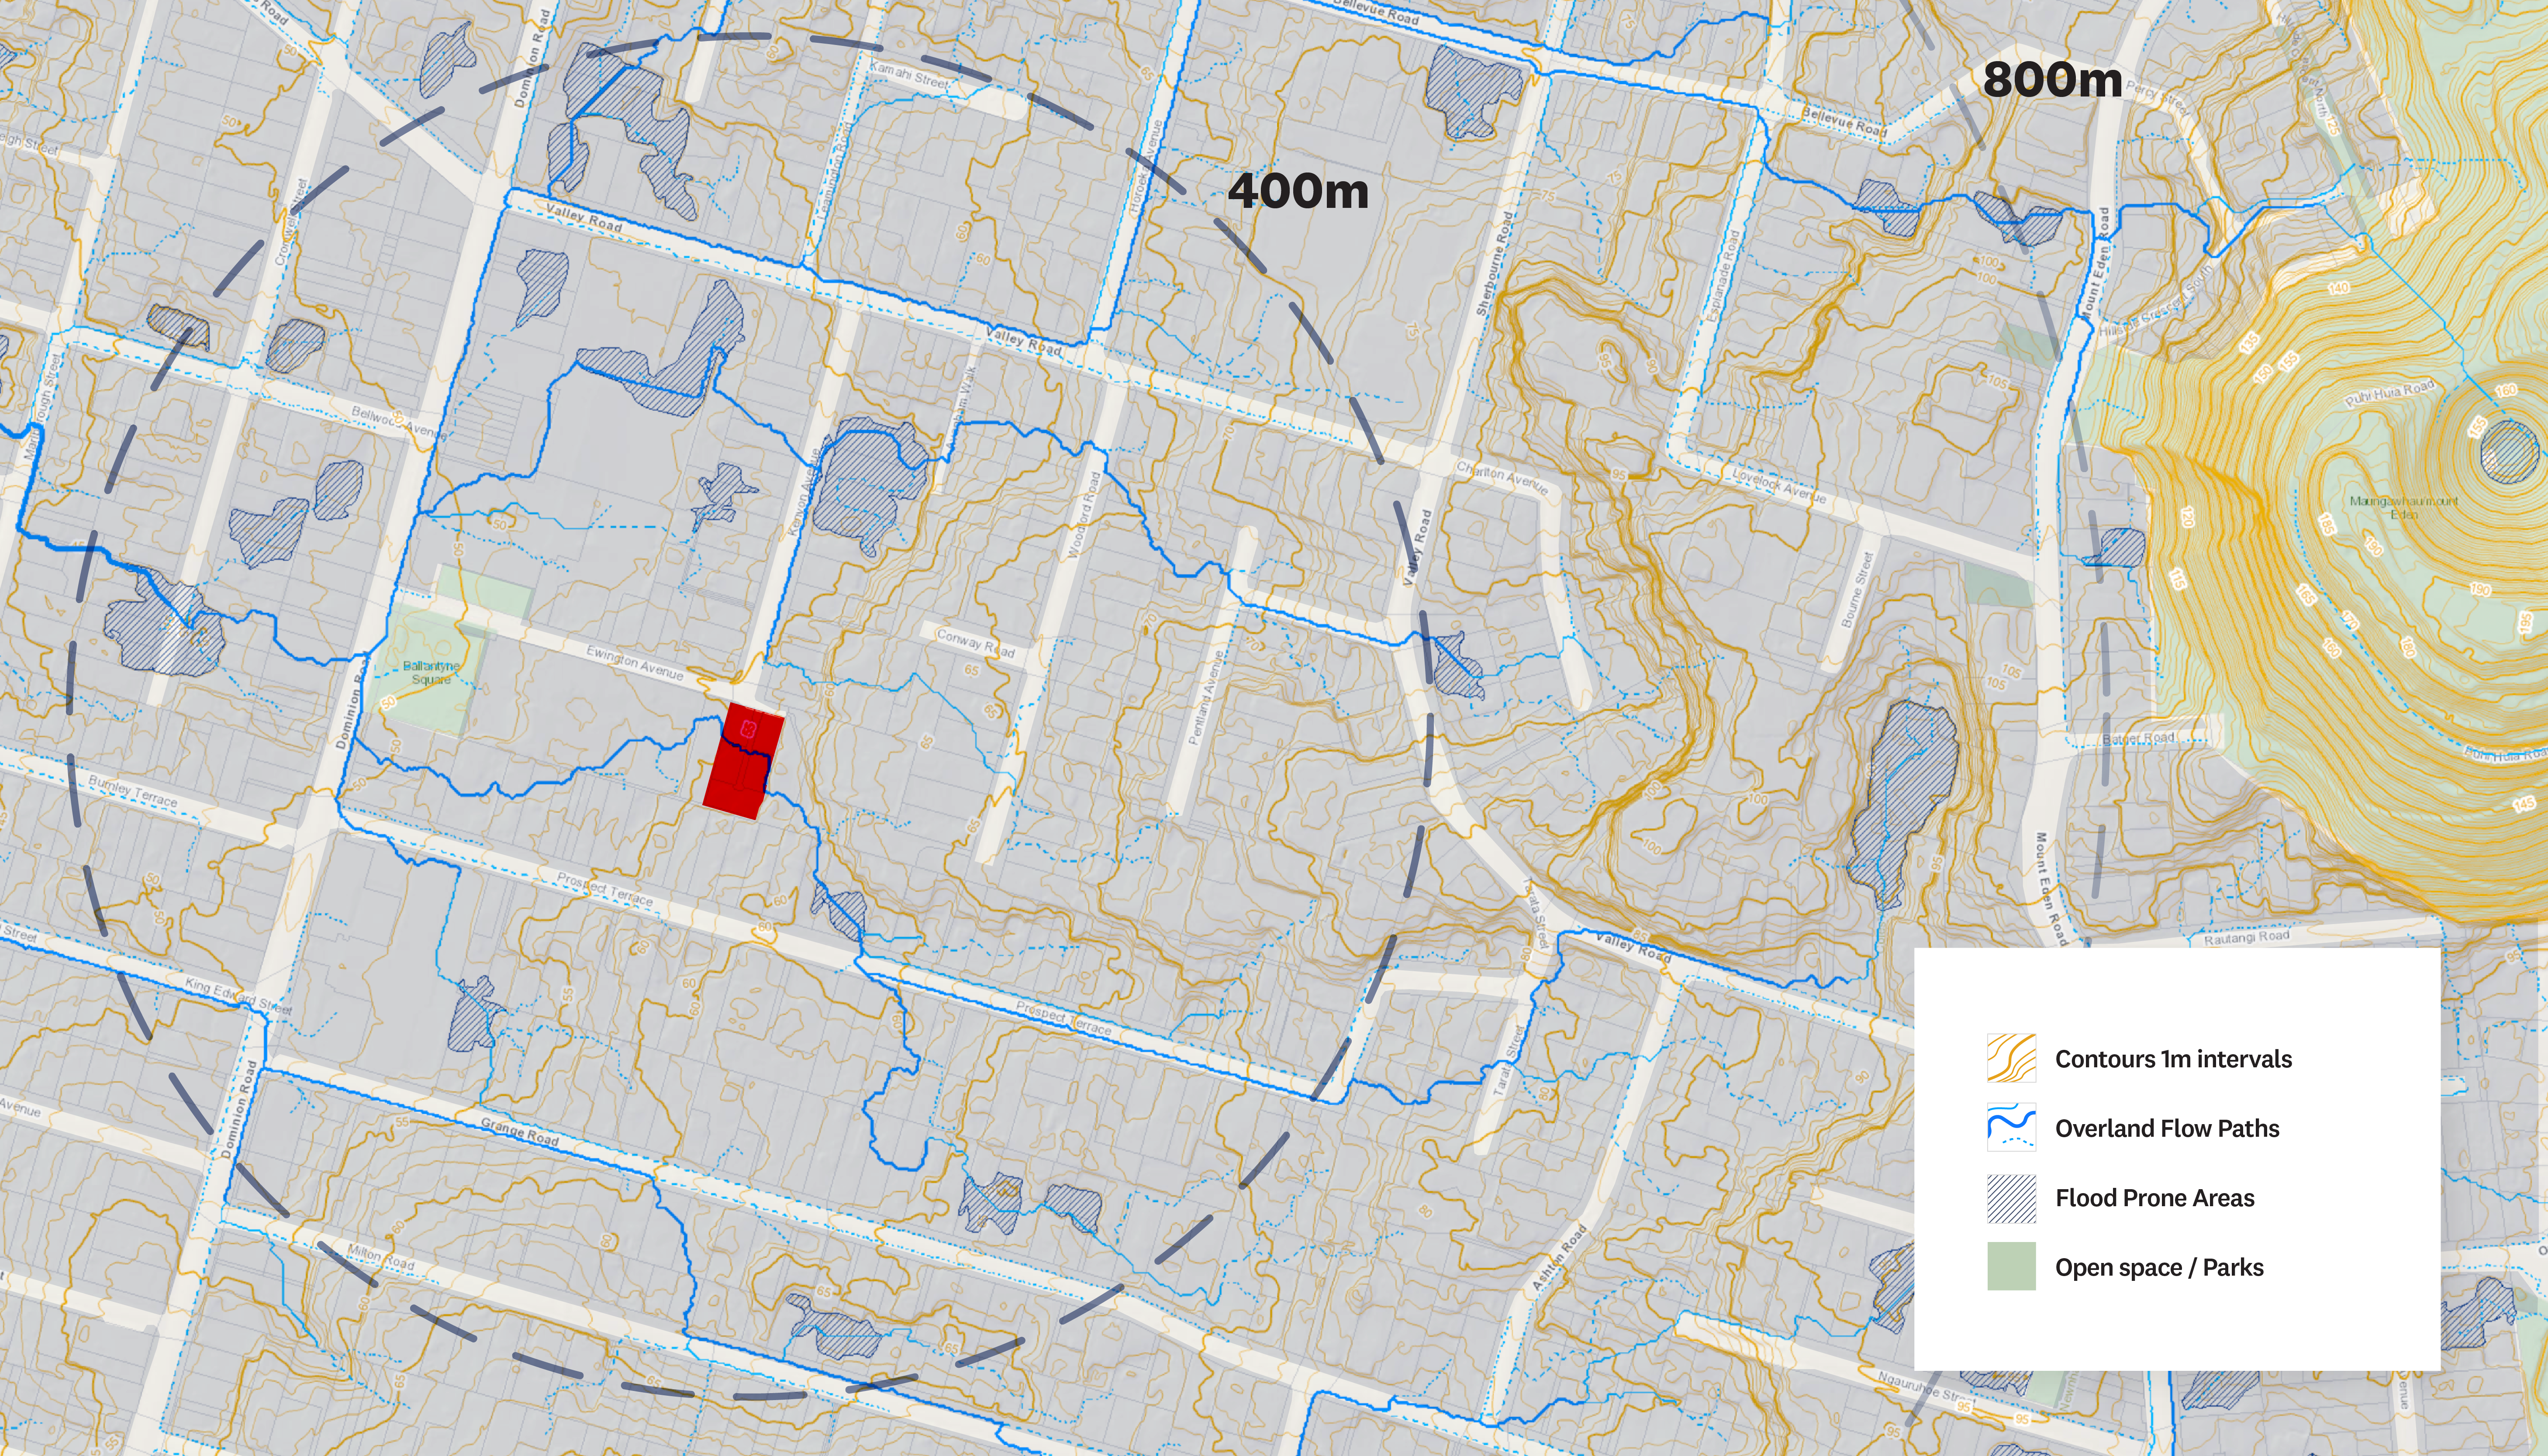
Identify the natural and cultural elements that could be used to reinforce local identity and character.
2.2.2 Movement
This analysis should identify where people want to get to and how they get there, including:
- Pedestrian desire lines, connections, formed pedestrian paths and worn tracks through parks that people use.
- Public transport types, routes, stations and frequencies of relevance to the site.
- Cycling routes, networks and facilities.
- Road function including arterial, collector and local roads, and how this affects the adjacent land-uses including access, air quality and noise.
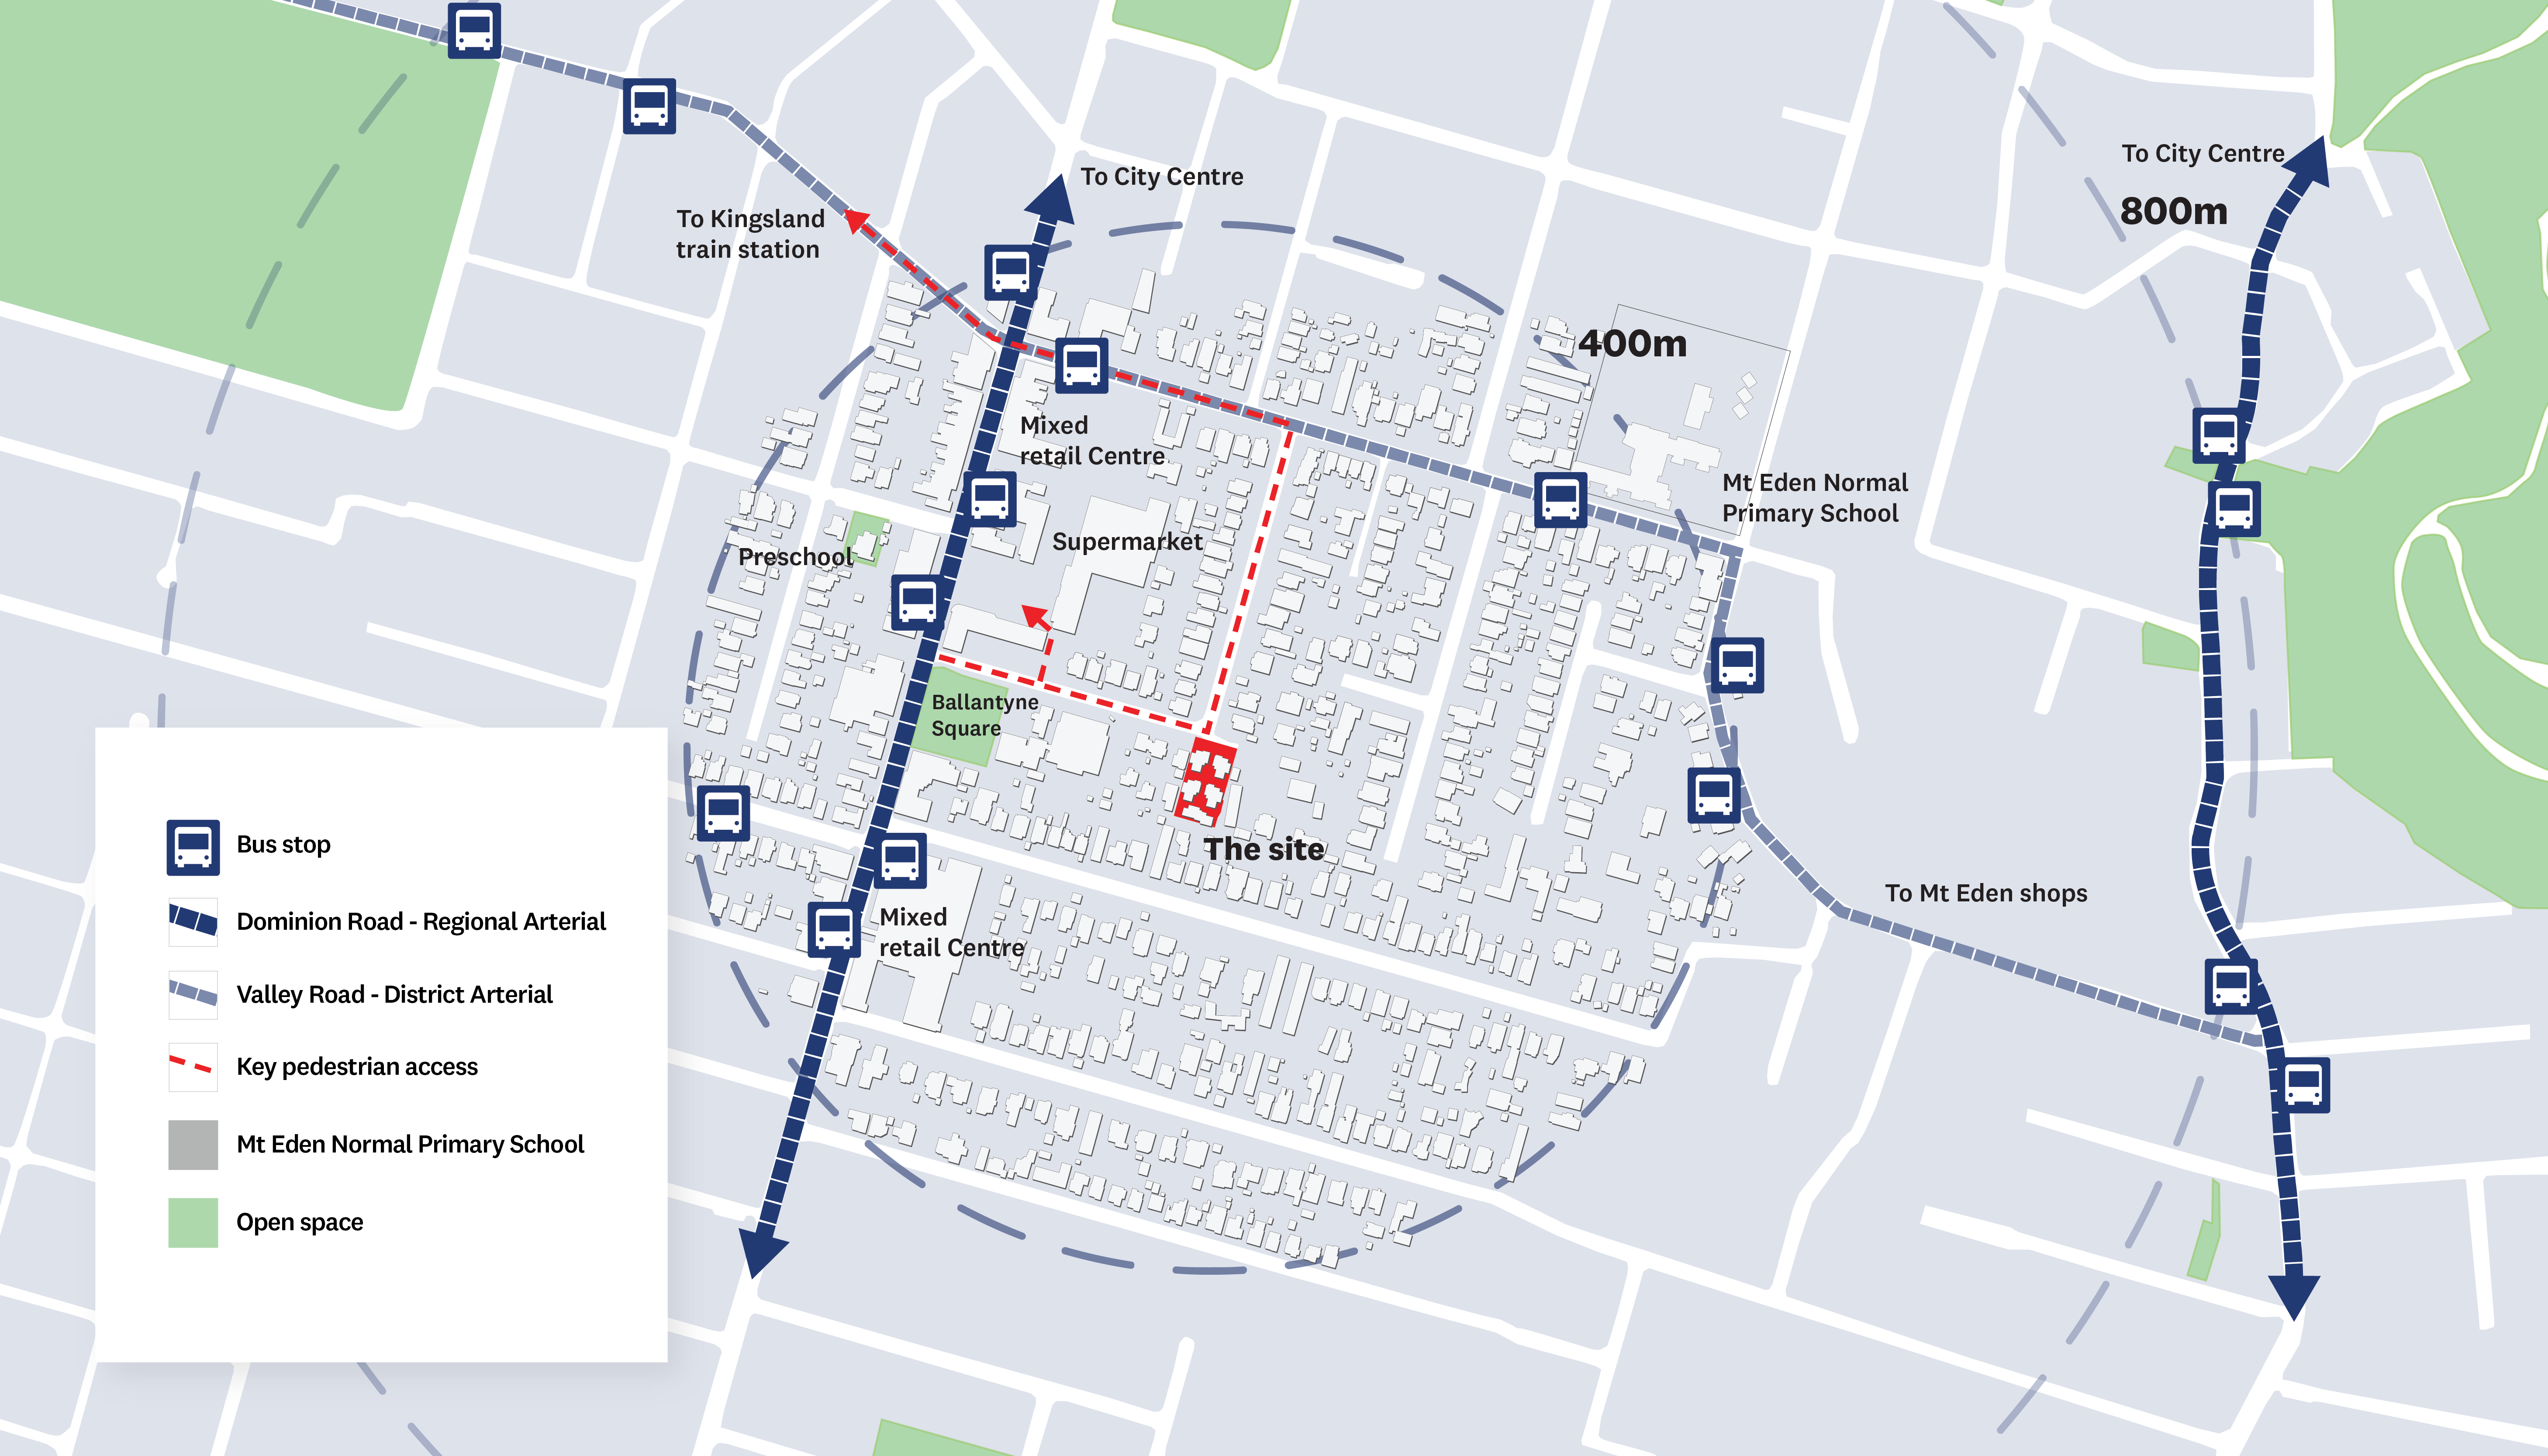
Analysis should identify where people want to get to and how they get there.
2.2.3 Character and urban structure
This analysis should identify the built character of the wider neighbourhood, and the structure of streets and blocks. This should include:
- Existing and historical development patterns including typical lots sizes and street orientation.
- Predominant architectural styles and heritage character.
- Significant landmarks or gateways and where they are located.
- The width of streets and degrees of enclosure (building to street width ratios).
- The block structure including block size, depth, road networks and degrees of permeability.
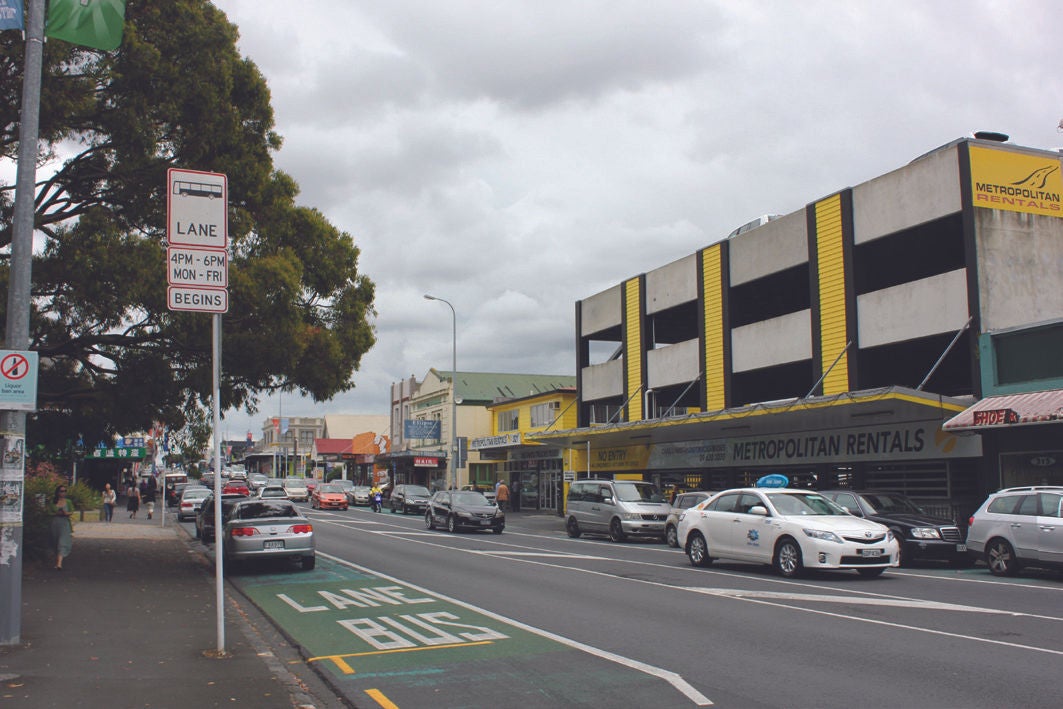
Dominion Road: Regional Arterial Road providing for two lane carriageway with flush median, bus lanes/ off peak parking, and footpath.
Kenyon Avenue: Local Road providing for two lane carriageway, on street parking, planted berm & footpaths.
2.2.4 Use and activity
This analysis should identify land uses and activities in the surrounding area that may inform the location and arrangement of activities within the site.
This should include:
- Types of activities within the neighbourhood including residential, commercial, infrastructure such as rail corridors, and open spaces.
- Where there might be any tensions for land use types such as residential adjoining a rail corridor or light industry, of relevance to the site.
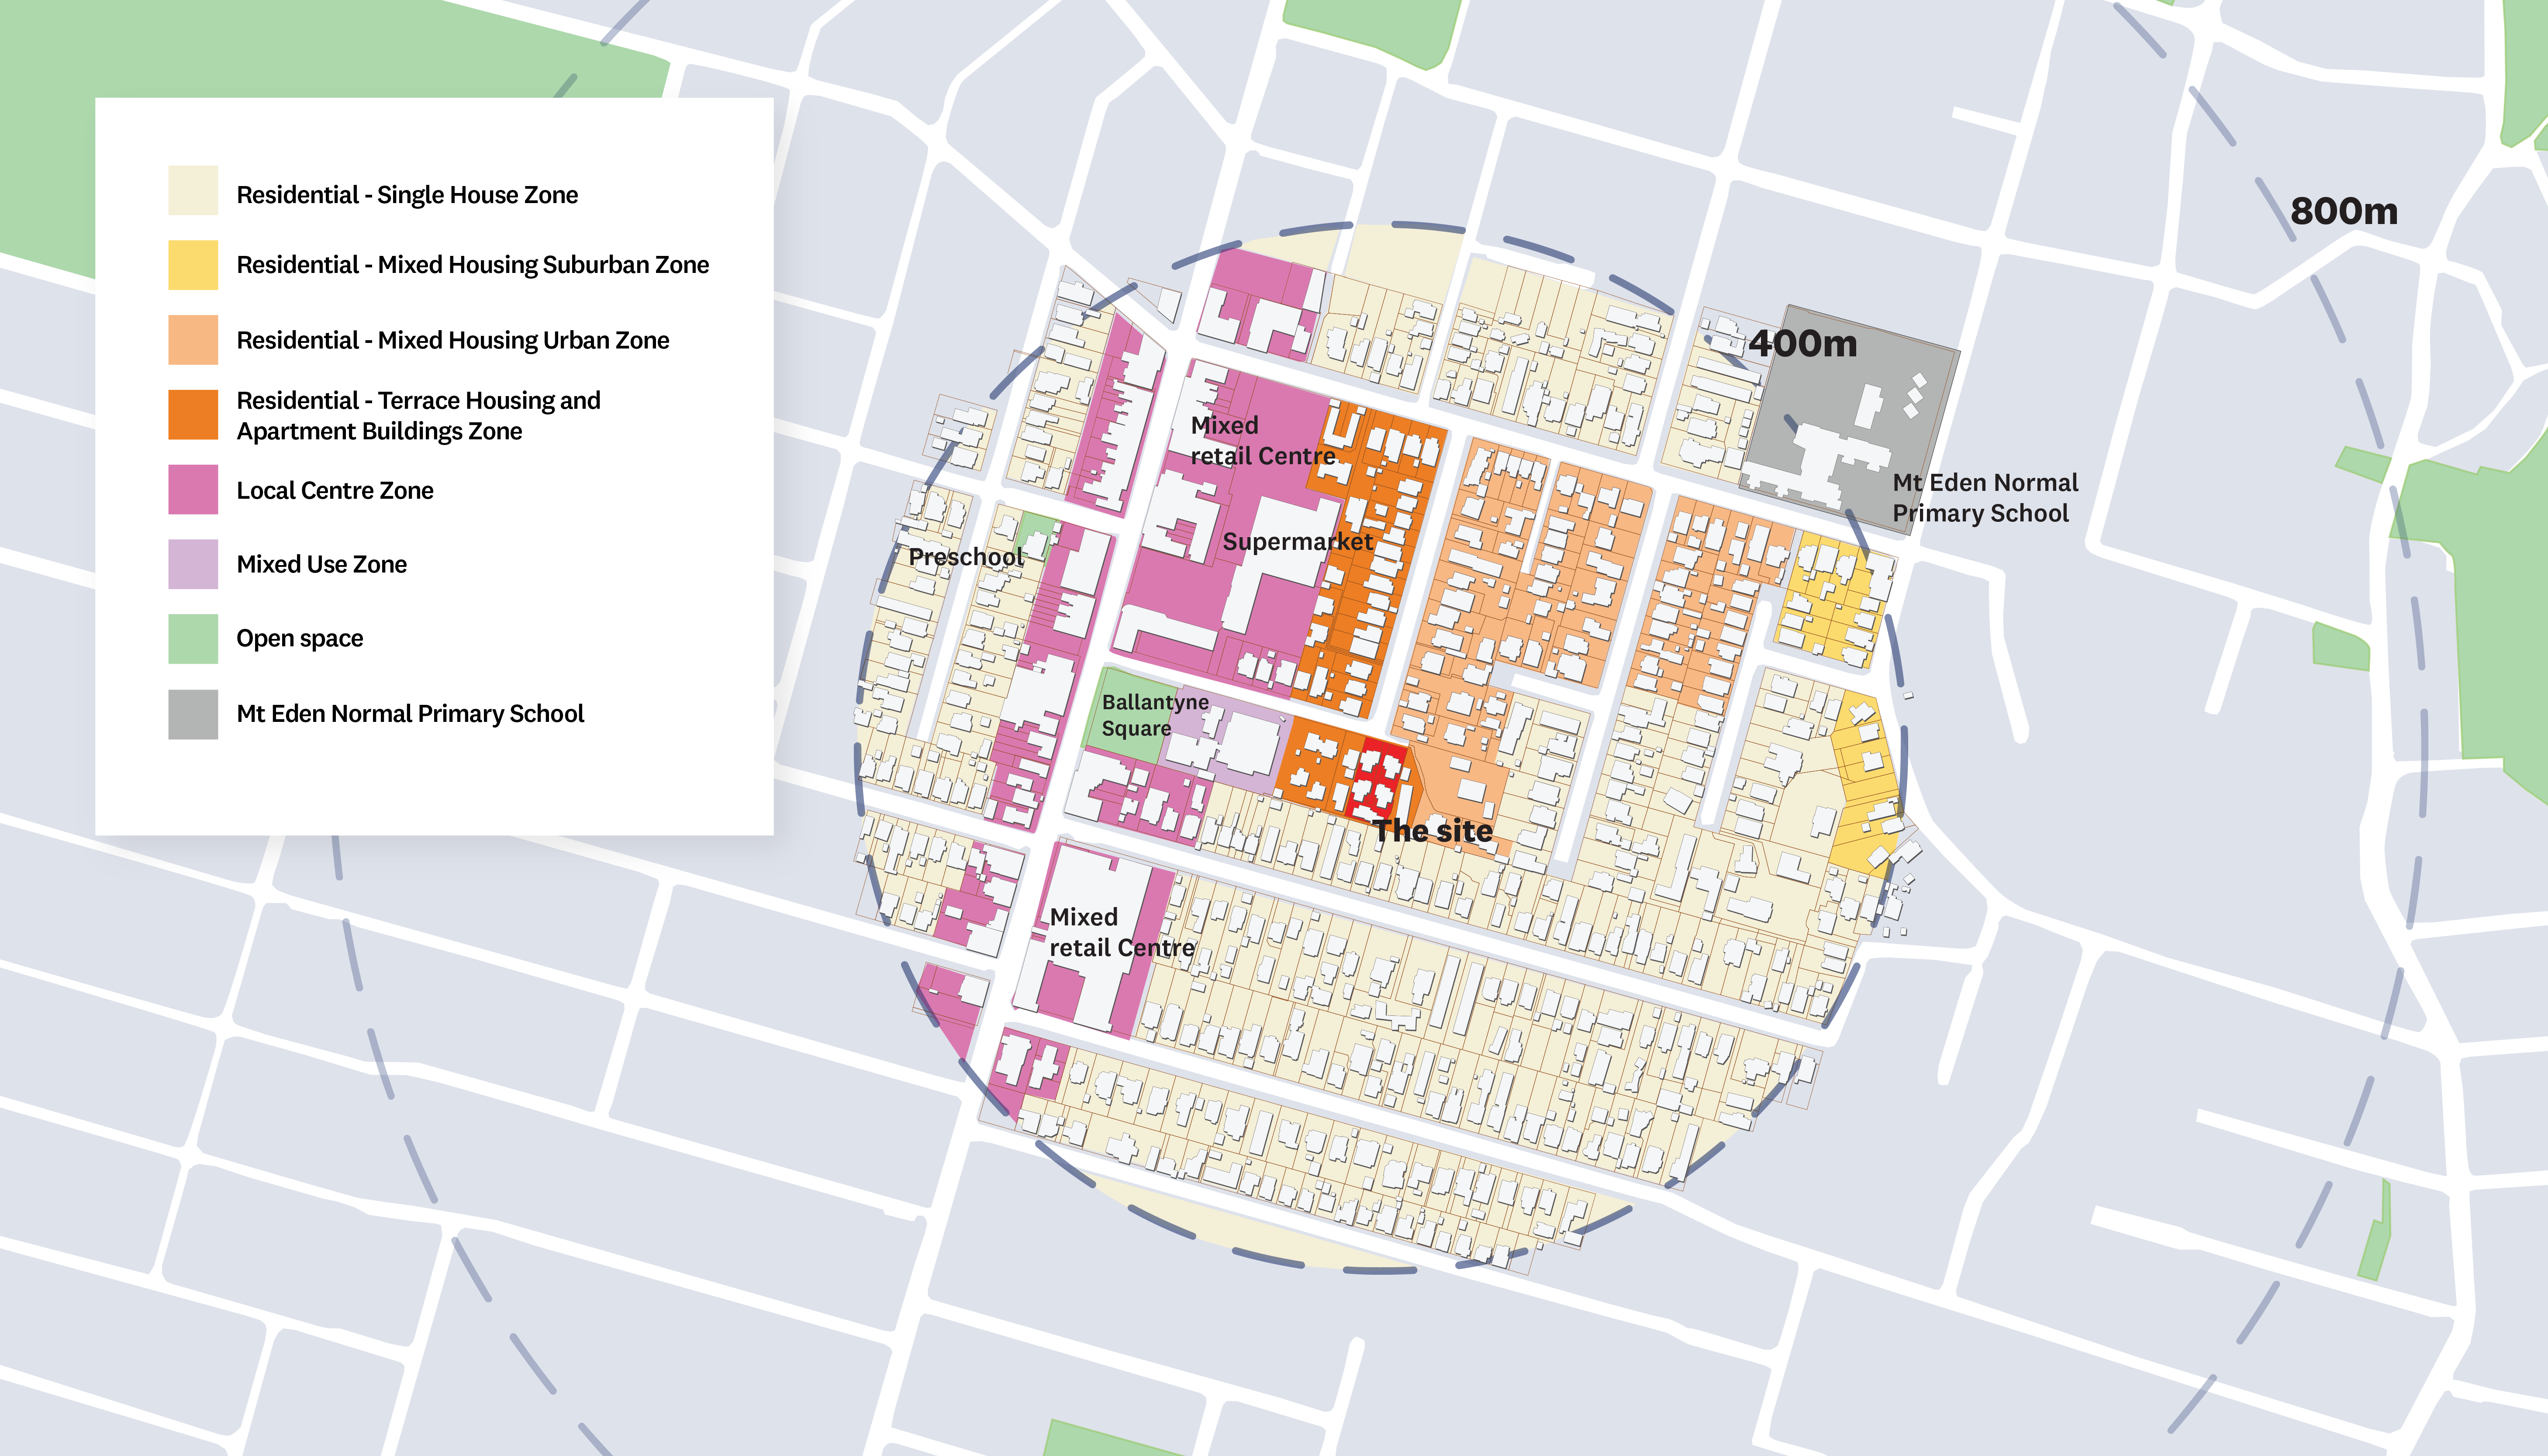
Identify land uses and activities in the surrounding area that may inform the location and arrangement of activities within the site.
Pedestrian and vehicle access from local shops to Ewington Ave.
Ballyntyne Square: Local Park at the end of Ewington Avenue.
Regional Arterial Road and local businesses on Dominion Rd.
3. Planning context
The Auckland Plan, City Centre Masterplan, Auckland Unitary Plan and other visions documents prepared by the local communities reflect the values that these communities have identified as being important to them now and in the future.
The identification of the outcomes sought for the site and area at the beginning of the design process will ensure that a proposal is more likely to meet the strategic directions identified by the community and be consistent with the future character anticipated for the area.
This analysis should identify:
- Visions and outcomes identified in the Auckland Plan, City Centre Masterplan and other visions documents prepared by the local communities, and the key objectives and policies in the Unitary Plan.
- The spatial aspirations, requirements and constraints for the site and area including heritage character, viewshafts, environmental and ecological features, and infrastructure constraints.
- The development controls that guide the bulk and form of buildings on the site including height controls, yard setbacks, building coverage, and landscaped requirements.
- Consented but not yet built developments and infrastructure projects that may have an impact on the site.
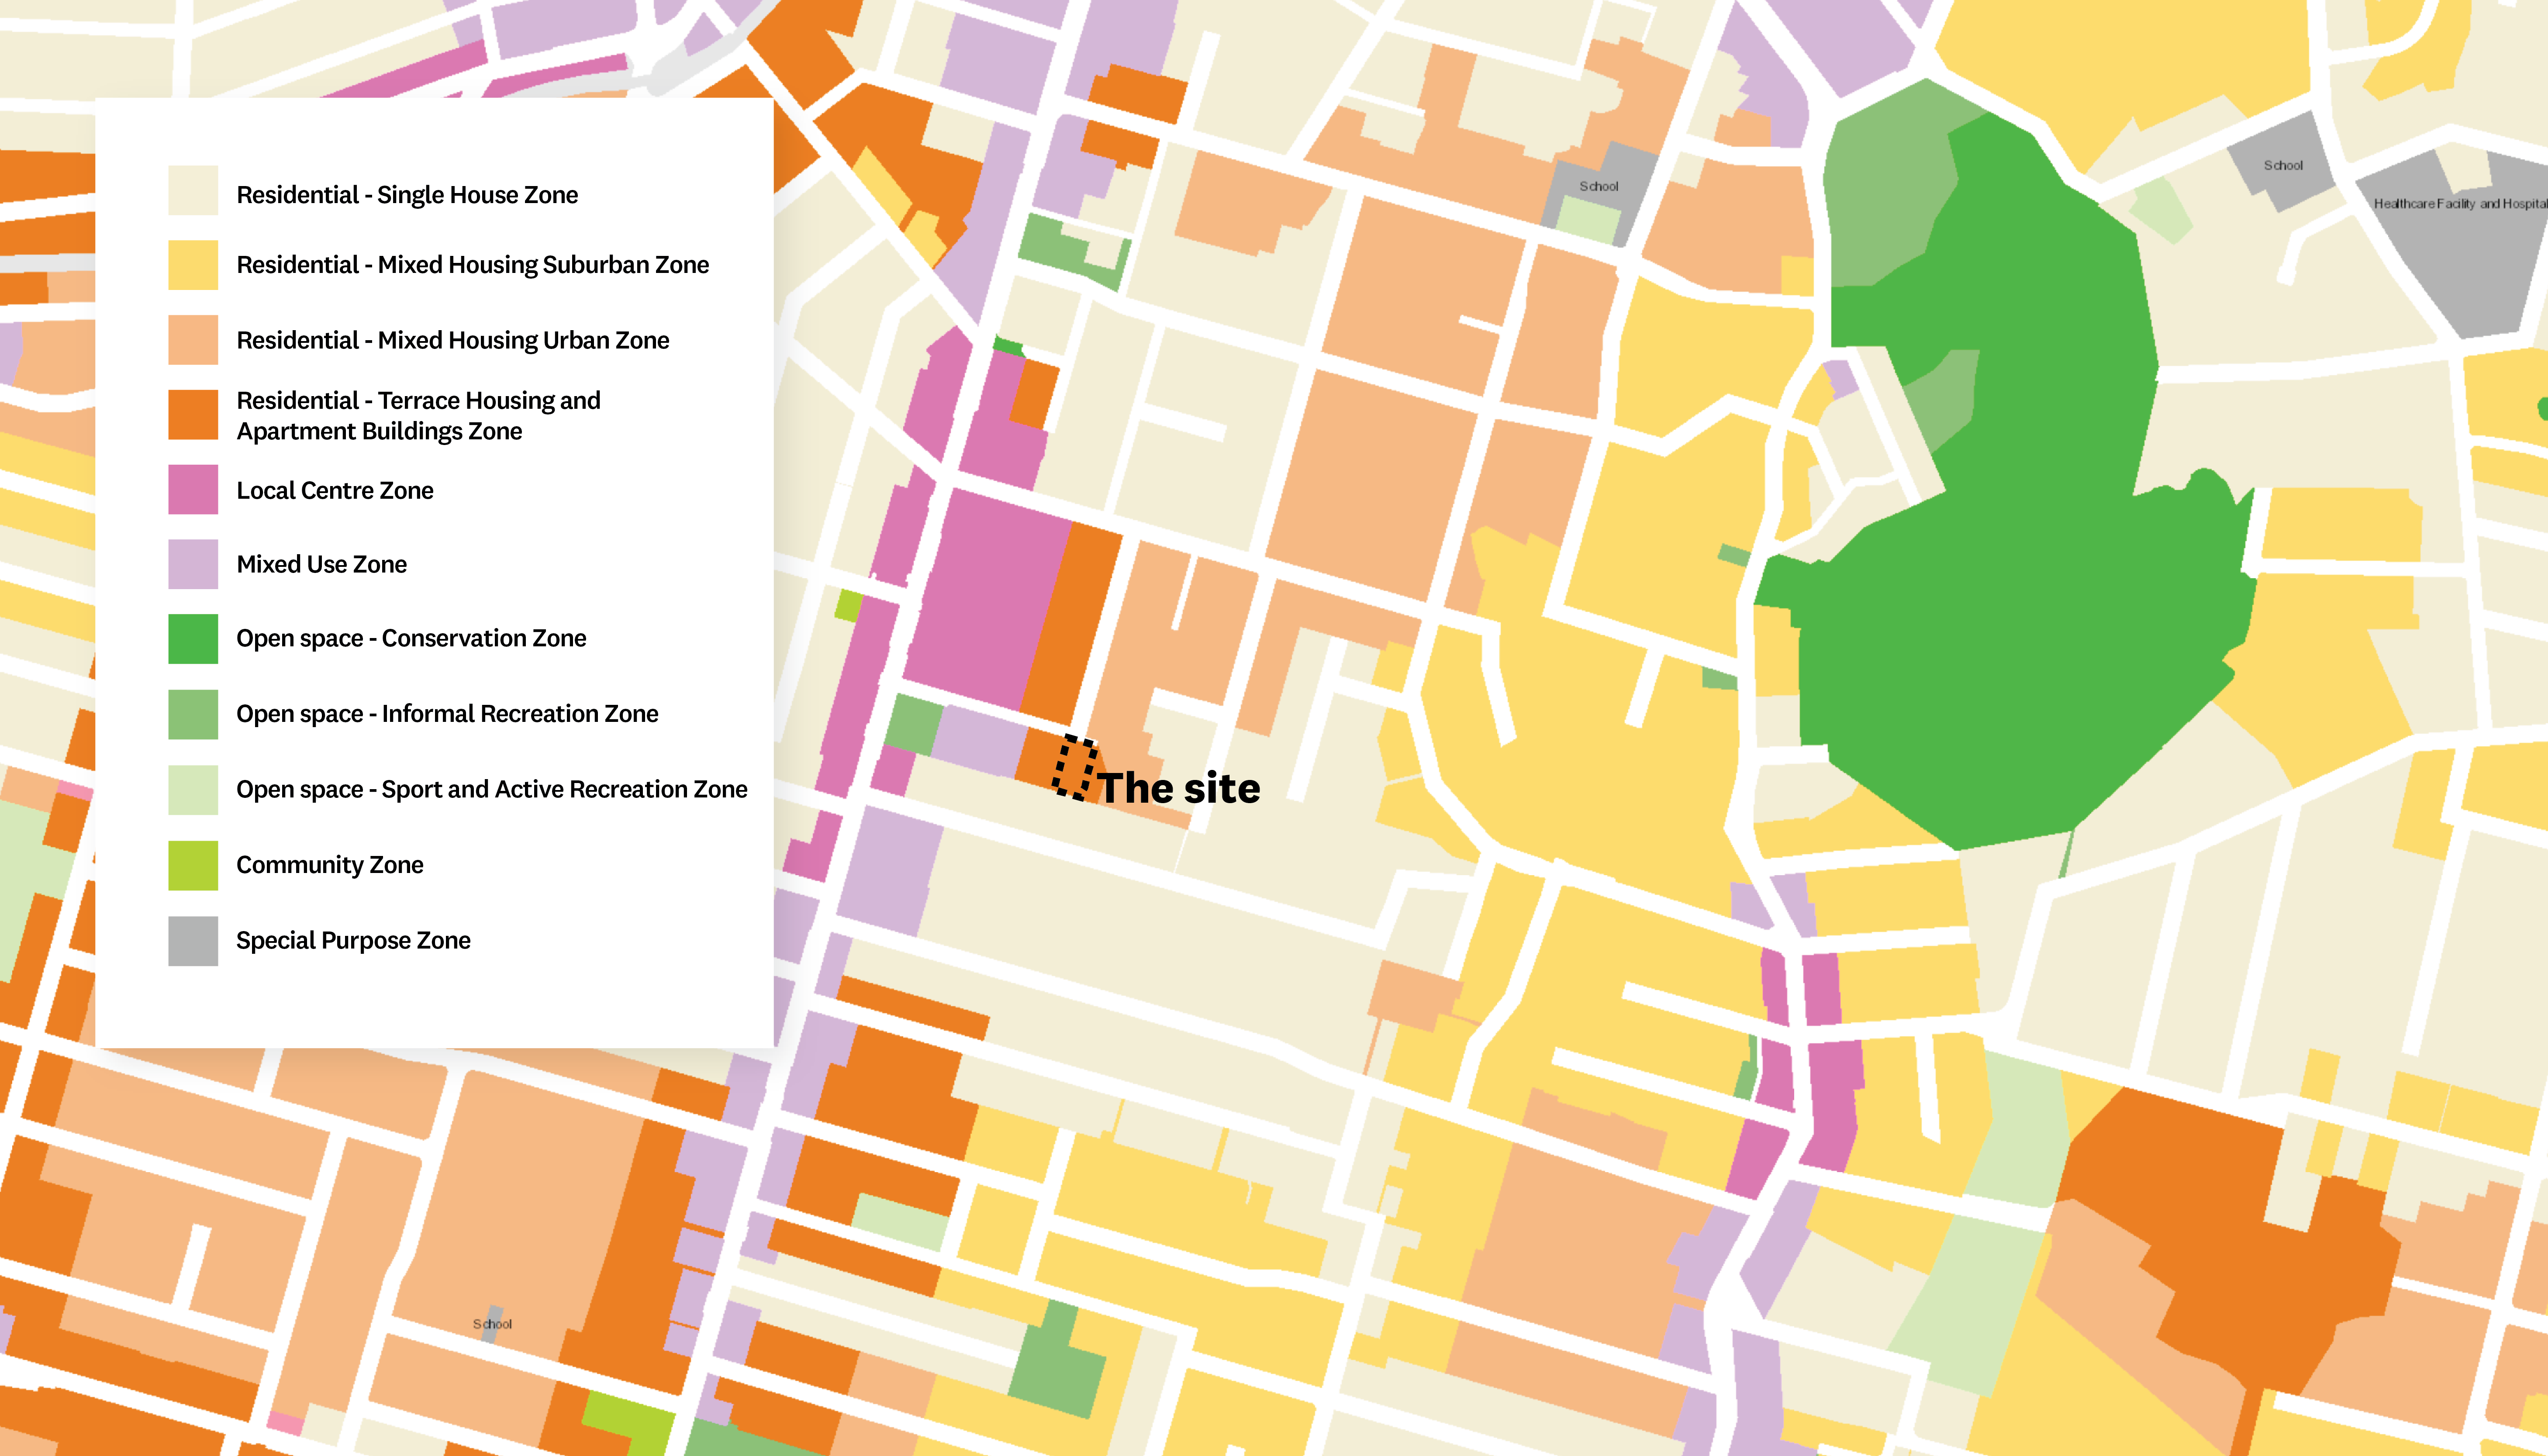
Identify the key development controls in the AUP that guide the bulk and form of the buildings on the site and how they might influence the layout of the site and building form.
Zone - Residential - Terrace Housing And Apartment Building Zone Key Development Controls:
- Maximum height of 16m
- Hirb side and rear: 3m + 45 degrees
- Alternative hibb:
- Side / rear and winthin 20m of road frontage: 8m plus 60 degrees
- Side / rear further than 20m from road frontage: 8m plus 60 degrees and 2m perpendicular to boundary
- 1.5m front yard, 1m side yard, 1m rear yard
- Maximum impervious area: 70% of site area
- Maximum building coverage: 50% of net site area
- Minimum landscape area: 30% of site area
- Minimum dwelling size: 30m² for studio or 45m² for 1+bed
- Outdoor living space - ground floor dwelling:
- 20m², min dimension 4m, gradient not exceeding 1 in 20.
- Patio / balcony / roof terrace: min 5m², min dimension 1.8m
- 20m², min dimension 4m, gradient not exceeding 1 in 20.
- Outdoor living space - above ground dwelling:
- Balcony, patio, or roof terrace
- Studio and 1-bed: min area 5m² and min dimension 1.8m
- 2+ Beds: 8m² and min dimension 1.8m
- Balcony, patio, or roof terrace
- Daylight: refer rule
- Outlook: principal living room (6m x 4m); principal bedroom (3m x 3m); other habitable rooms (1m x 1m)
4. Opportunities and constraints
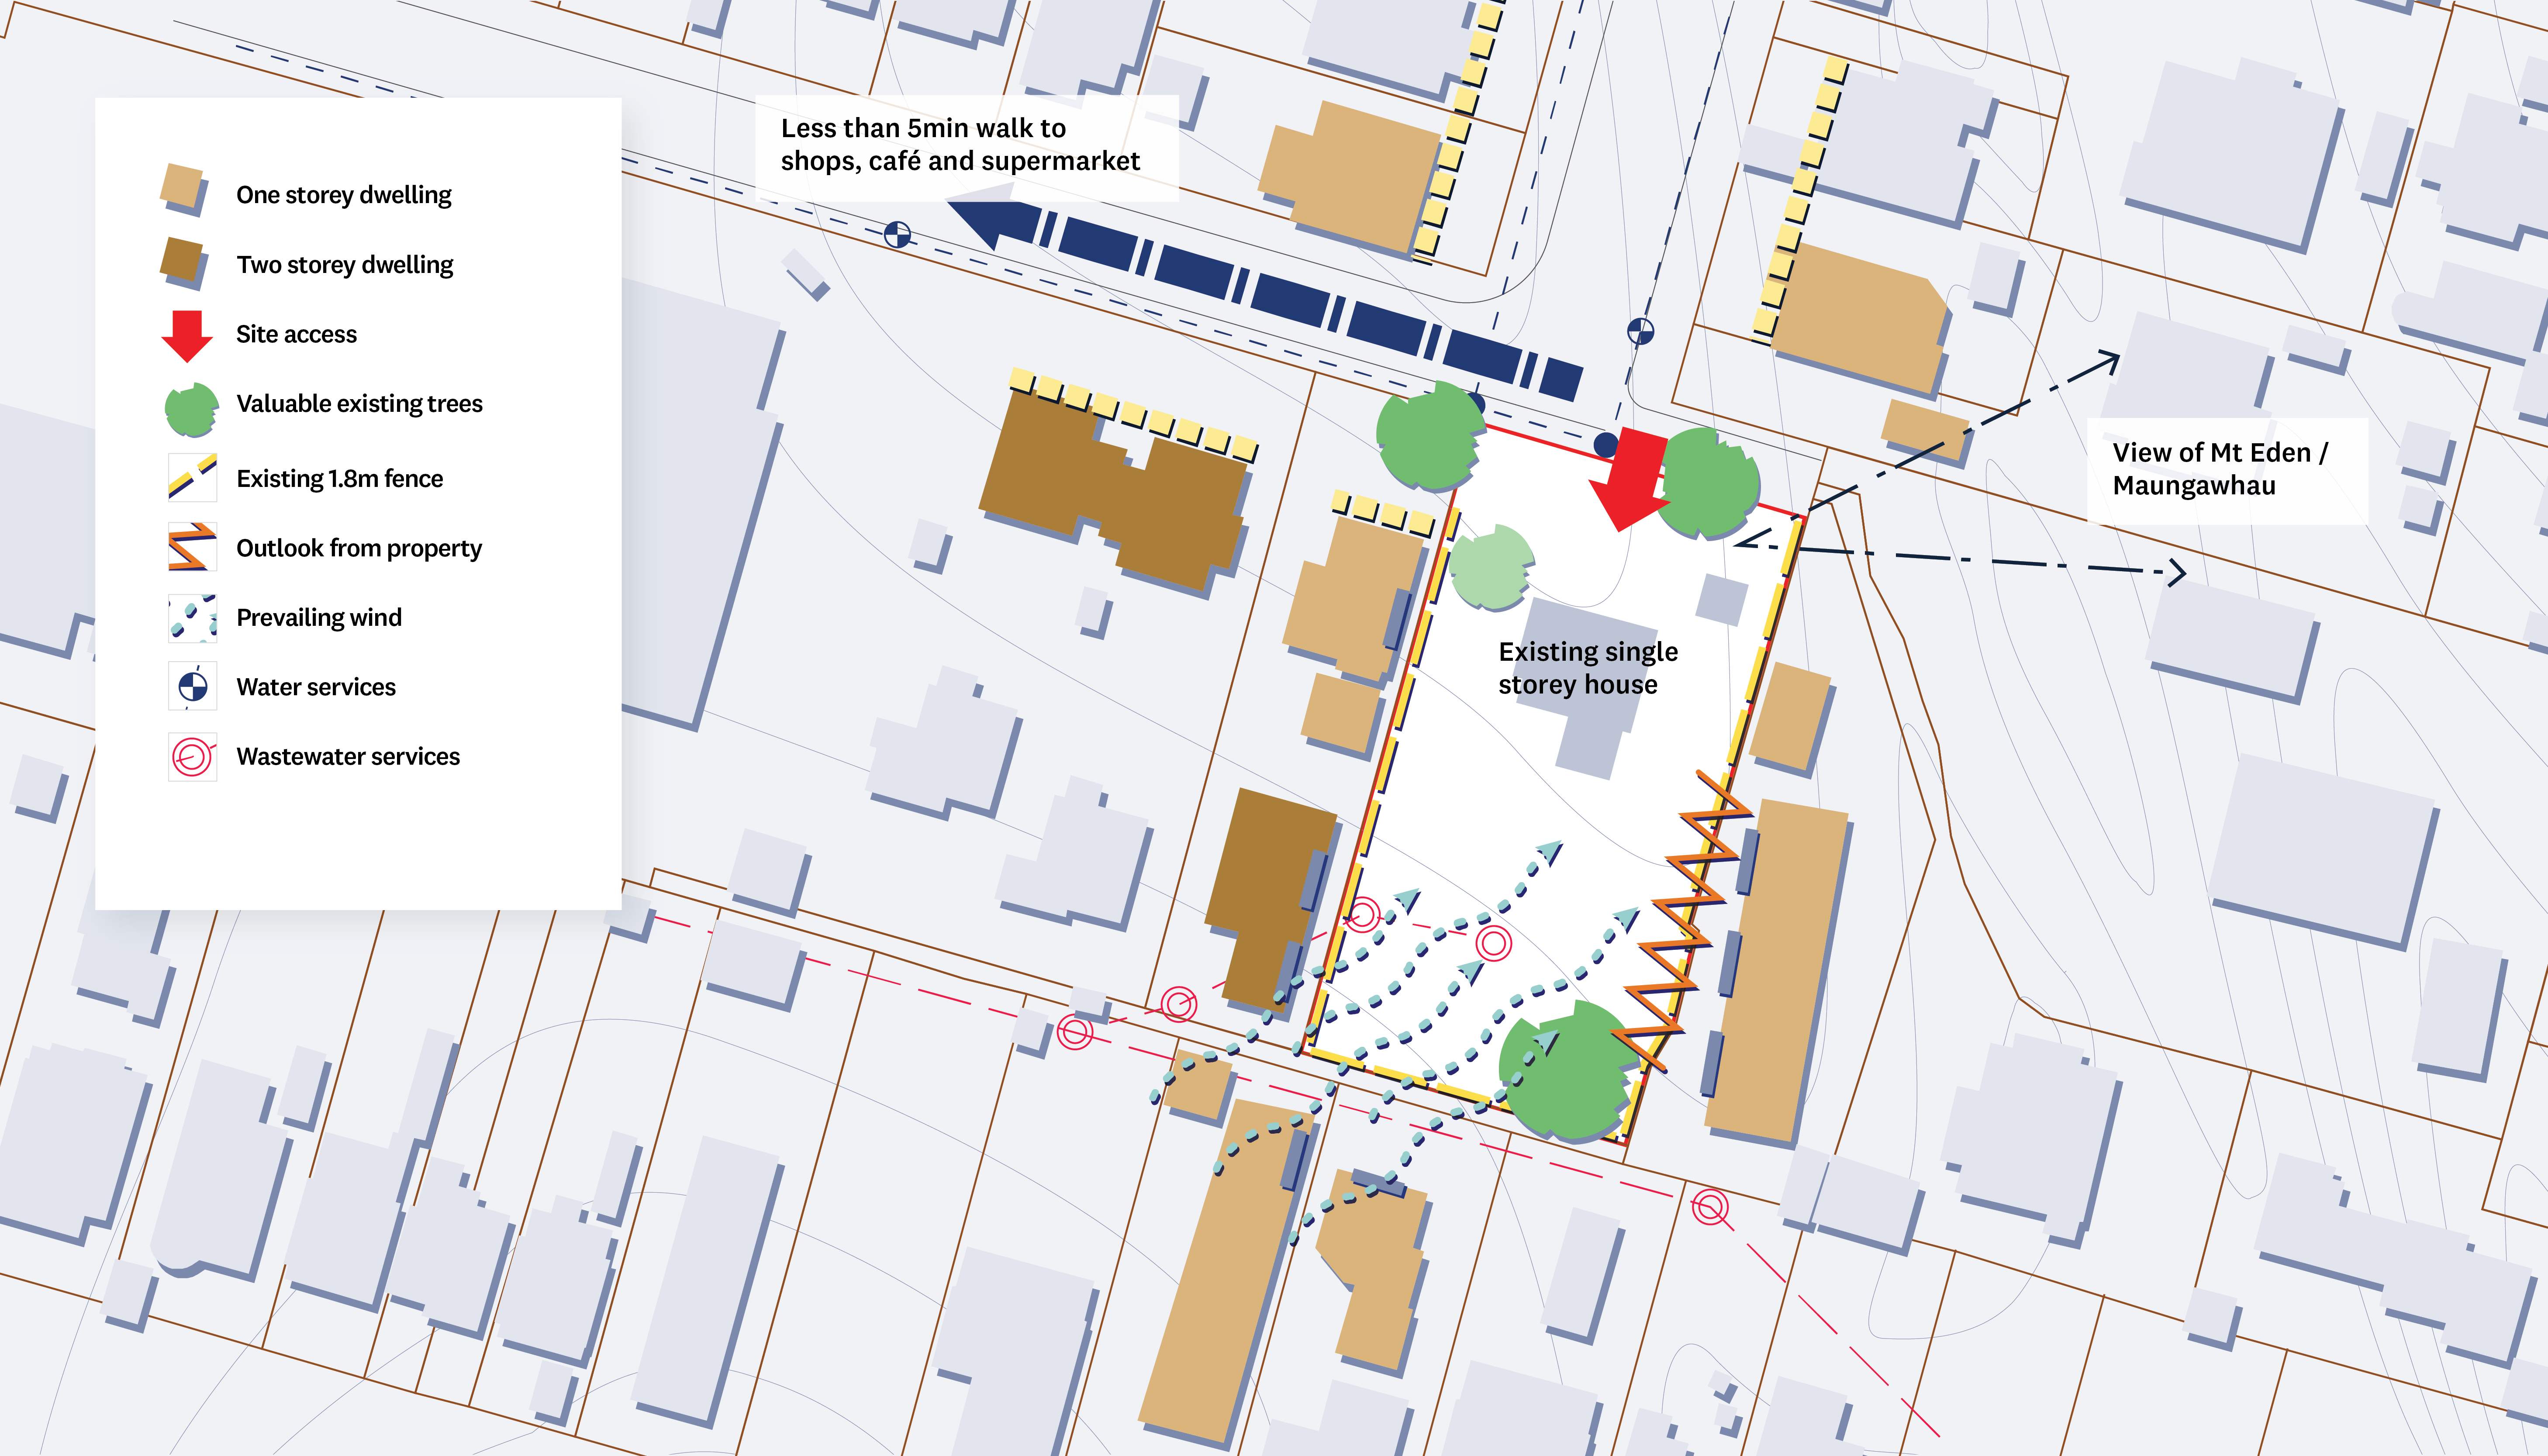
Identifying the issues and opportunities for a proposal provides a useful framework for testing and developing options. An opportunities and constraints diagram helps to prioritise the factors a proposal should respond to and becomes the primary direction for the design. It is also a useful communication tool as it summarises the information in the analysis plans and can be read and understood quickly. An opportunities and constraints analysis is required for all design statements.
An opportunities and constraints diagram provides the conclusions that have been reached from the site and neighbourhood analysis and planning context, and it sets out the important parameters for the development proposal that will follow. The information presented will begin to identify where the building platform(s) should go, where areas of private outdoor space could be located, where any effects to or from neighbouring properties will need to be managed etc.
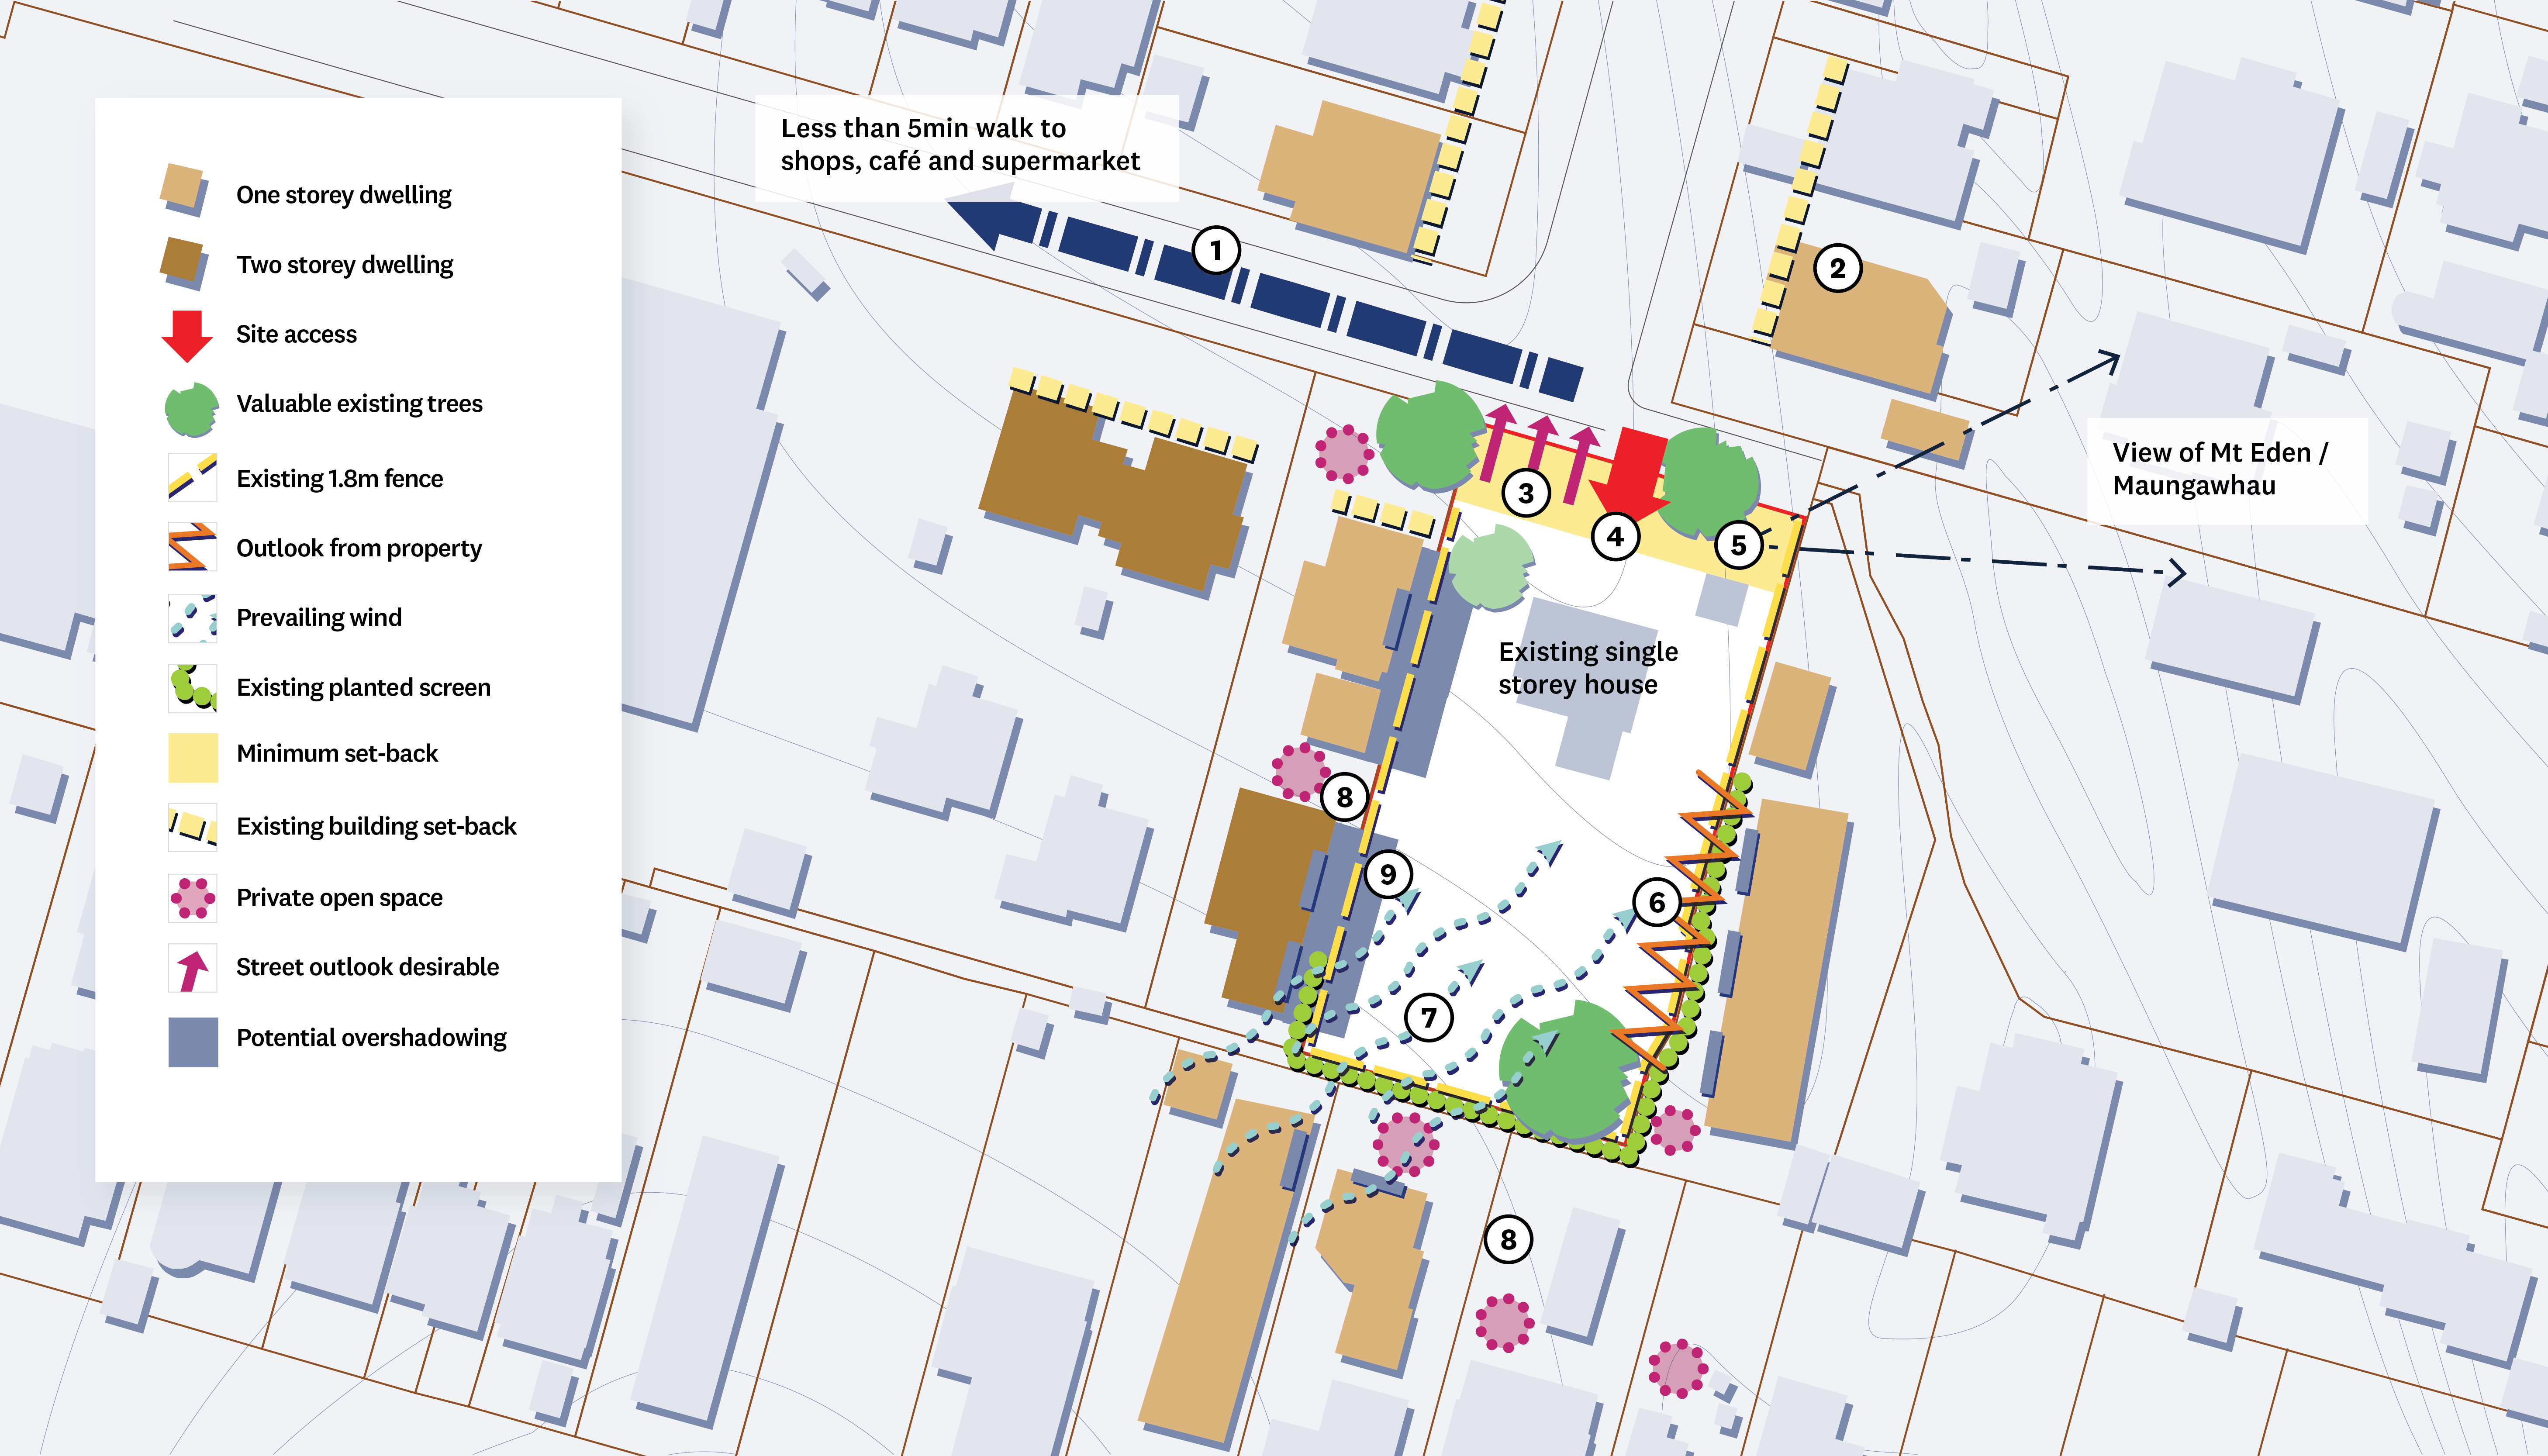
Identify opportunities and constraints in the site, neighbourhood and planning context.
- Short walk to supermarket, schools, shops, cafe and restaurant, local schools and parks so is ideal for intensification
- Established architectural style and material palette to respond to
- Building set-backs are consistent, therefore a similar set-back will need to be adhered
- Entry to site is shared by multiple properties, therefore need to keep new entry simple to avoid adding complexity
- Benefits from unobstructed views of Mt Eden
- Need to manage outlook of proposed development to protect privacy of adjacent properties
- Existing 1.8m fence and mature vegetation provides good shelter and privacy
- Adjoining private yards are located a good distance from common boundary
- Some potential afternoon shading from adjacent properties to the west
This diagram becomes very important in the ongoing consideration of a development proposal, when assessing how the development proposal responds to the conditions of the site. It is also the point in the design process where the information is weighed up to determine what is most important. Where there are conflicting objectives these should be clearly articulated along with the rationale for the final design decision.
- Depending on the complexity of the site, the opportunities and constraints can be recorded on one plan or they can be separated on to two, and are typically presented on one or two A3 pages with an annotated plan and photos.
- Use an aerial photograph, perhaps as used for the earlier site analysis, as a base to the diagram to aid consistency. This should show buildings, open spaces, vegetation etc. You can download an aerial photo of your site from Council’s GIS server.
- Decide what information from your analysis should be presented on the opportunities and constraints diagram. Try to prioritise information based on its effect on the design of the development.
- Always include a key, north arrow and scale bar on maps. Use one colour for opportunities (symbols, font, arrows etc.) and another colour for constraints, to make the map easy to understand.
- Try not to overcrowd the map with too much information. If the map is becoming full, consider presenting opportunities on one map and constraints on another.
- Supporting text can be included to elaborate on the information presented, such as competing objectives e.g. views to south but requirement to locate private open space to the north.
5. Design response
Relating the project design back to the preceding analysis provides a robust explanation for the project. The design response provides a detailed description of the proposed development and explains how it responds to the opportunities and constraints, and the wider context analysis. It illustrates the final form and appearance the development will take, including the materials, colours and finishes of all buildings.
The design response includes:
- A concept plan
- Site layout
- Building design
- Sunlight access
- Open space plans
- Streets, accessways, laneway design
The type and amount of information required will depend on the complexity and scale of the development.
The concept plan shows how the general design principles of the form and layout of the proposal respond to the opportunities and constraints identified in the context analysis. It represents the development at a conceptual level, illustrating the main design ideas, principles and factors. For example, the general locations of built form vs. open space, hard edges vs. visual permeability, areas of activity vs private and quiet spaces, areas benefit from the solar orientation and views, the key movement paths, service areas and level changes.
The concept plan is a key communication tool for explaining the rationale for the development and should be used to during meetings with council officers, as part of the consent application, and at presentations and hearings.
The concept plan should:
- Show how the analysis of the context led to the chosen design principles.
- Show how the design responds to the opportunities & constraints identified previously.
- Explain and justify the way the buildings, movement routes and open spaces are set out.
- Demonstrate a genuine response to context and not simply justify predetermined design solutions.
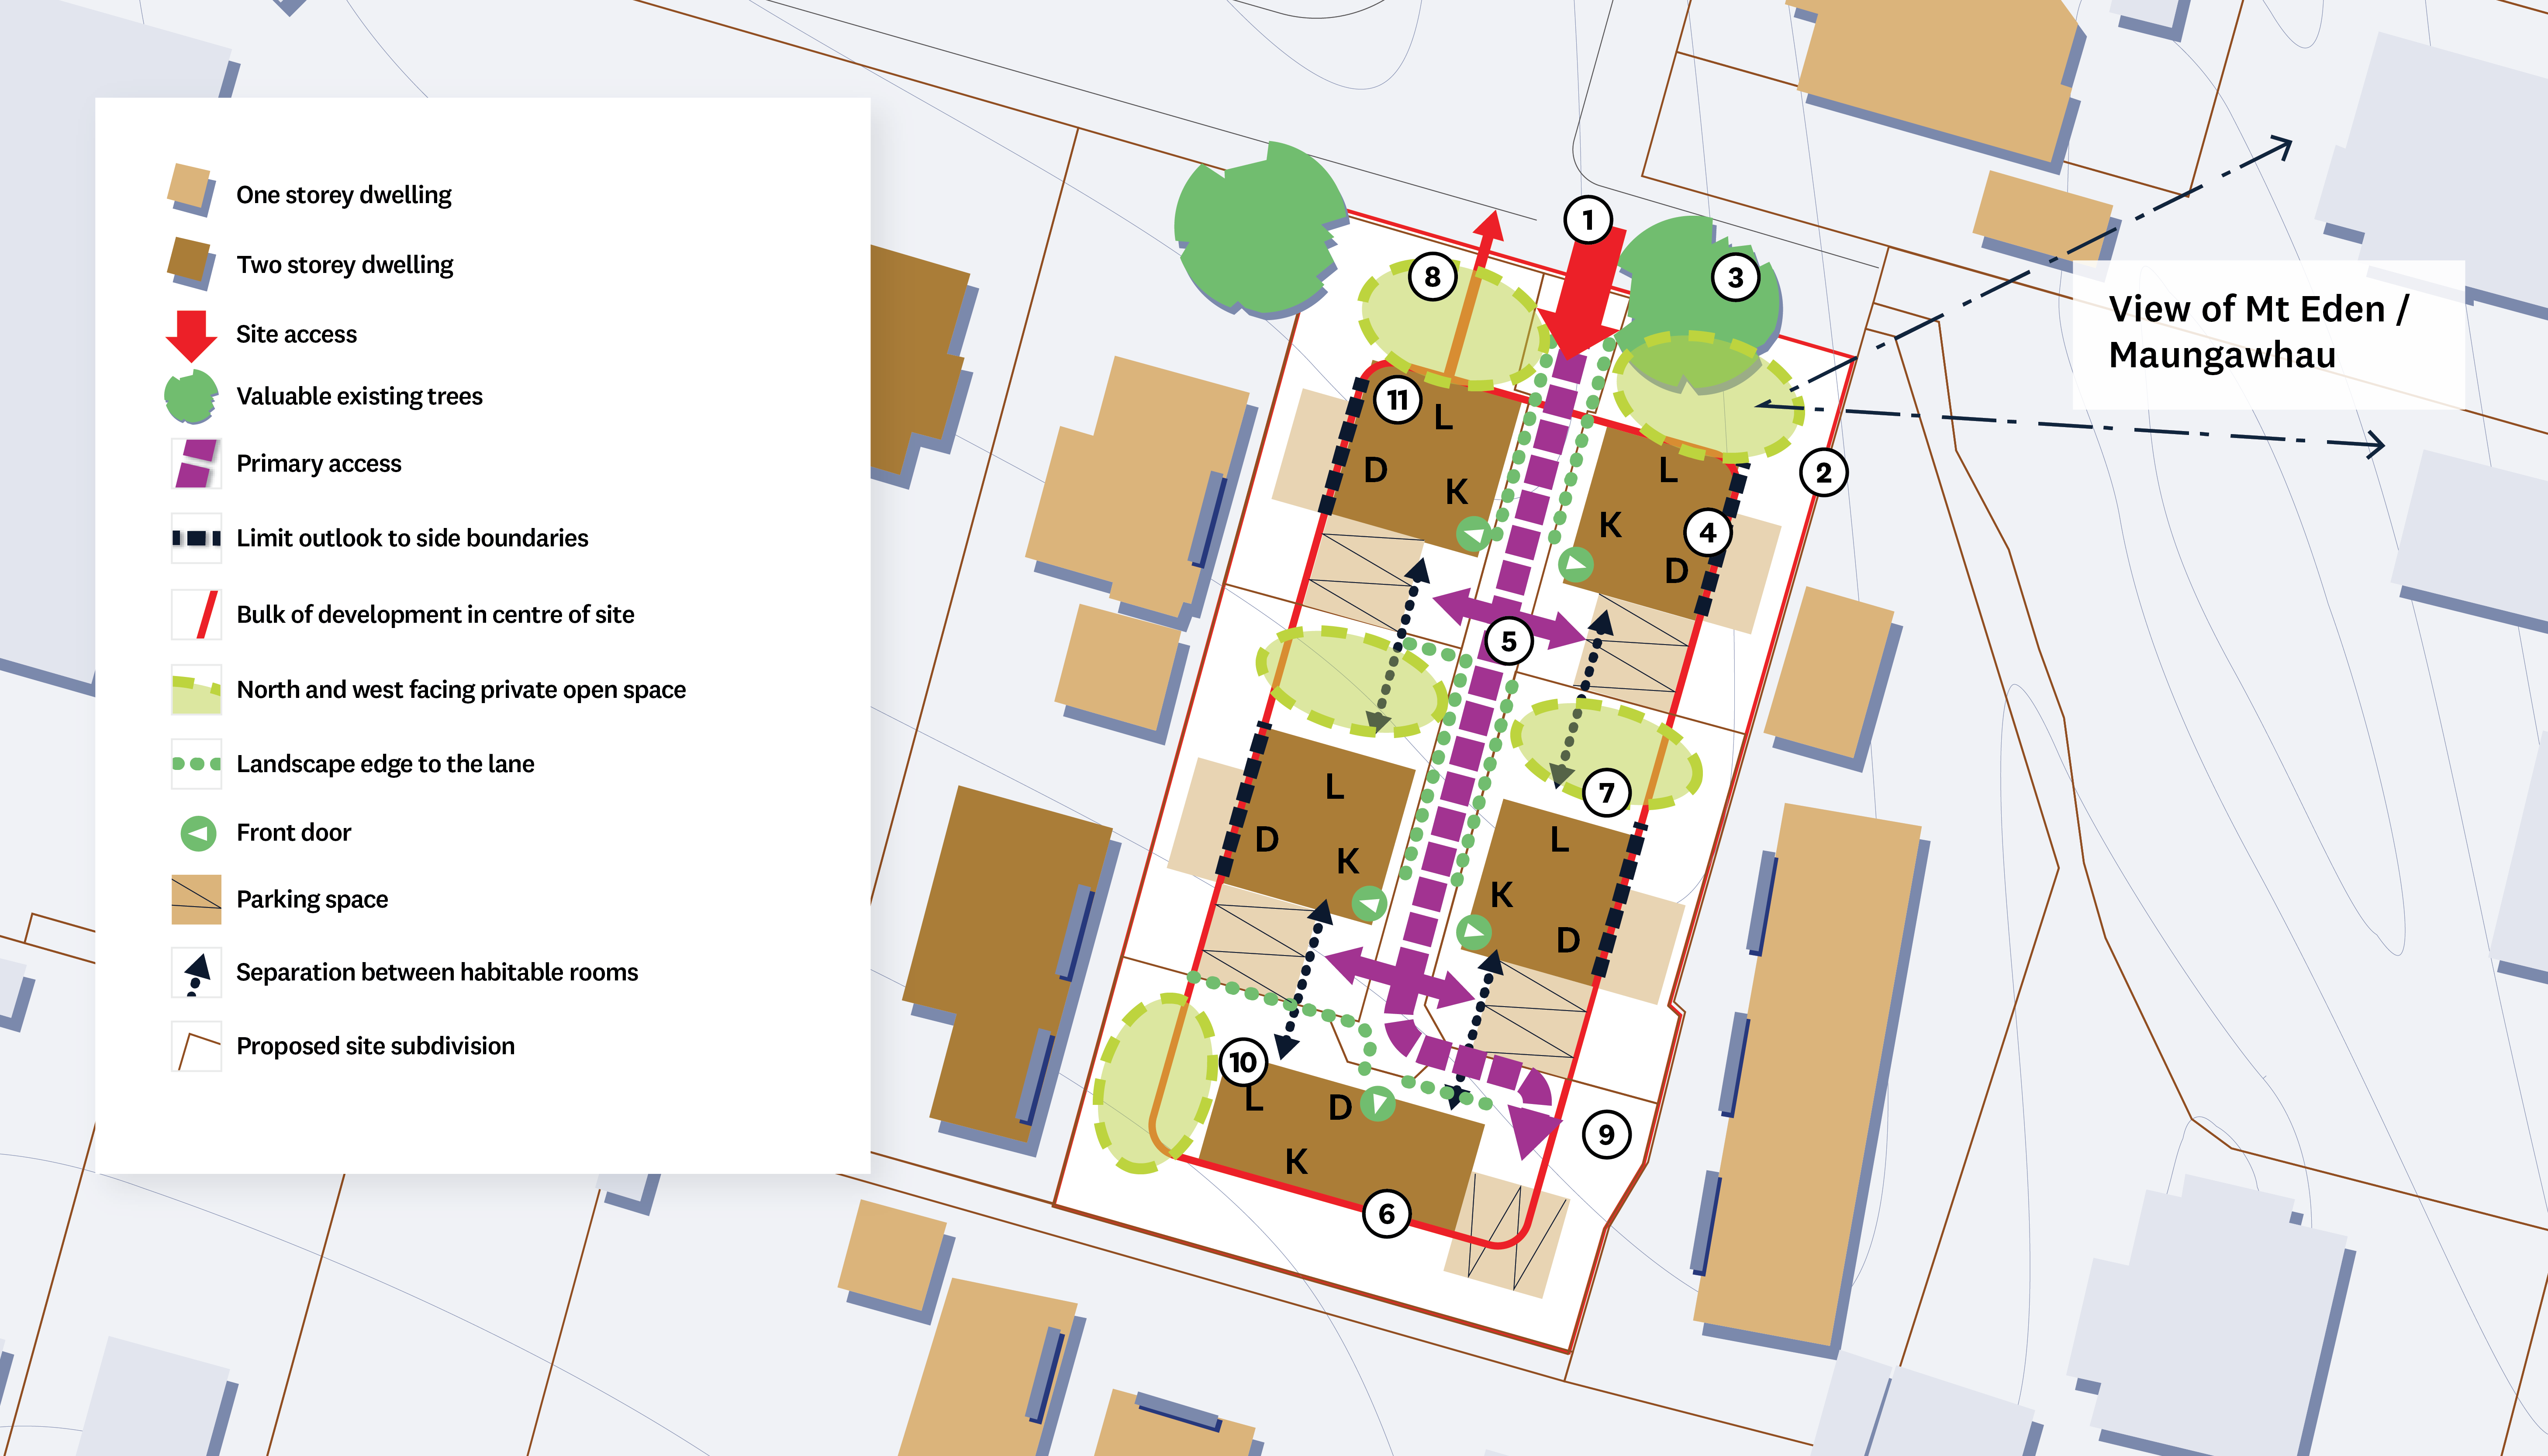
The concept plan shows how the design responds to the opportunities and constraints previously identified in the context analysis.
- Single access point from the street
- Locate private open space in northeastern corner to benefit from views to Mt Eden
- Retain existing mature trees
- Locate windows to maximise views to Mt Eden
- Singlular vehicular circulation to maximise efficiency
- Locate building bulk in the core
- Locate private open space away from street but in a location with maximum solar access
- Front yard should have low fencing with small shrubs for privacy
- Two storey ‘living’ elements of dwellings separated by 10-12m to minimise overlooking and overshadowing on adjacent dwellings
- Living spaces located adjacent to open space
- Living spaces located on the front with large windows maximise natural surveillance.
The site layout plan should demonstrate the following:
- That the building(s) and site design are integrated.
- That the building platform(s) works within the existing site conditions.
- That the building(s) has been placed and orientated for passive solar design.
- That the internal layout is appropriate for the proposed uses, considering privacy, outlook, passive surveillance, views and solar access.
- That the buildings have been placed to create quality private open spaces which are clearly defined and differentiated from public open space. That the private outdoor spaces are attractive, functional and enjoyable.
- That the proposal respects the neighbours. The location of the neighbouring houses, windows, private open spaces and accessways should be shown.
- That the pedestrians, cars, access, and servicing has been integrated with the design of the site and the street.
- That the landform modification of the site integrates with the broader landform character.
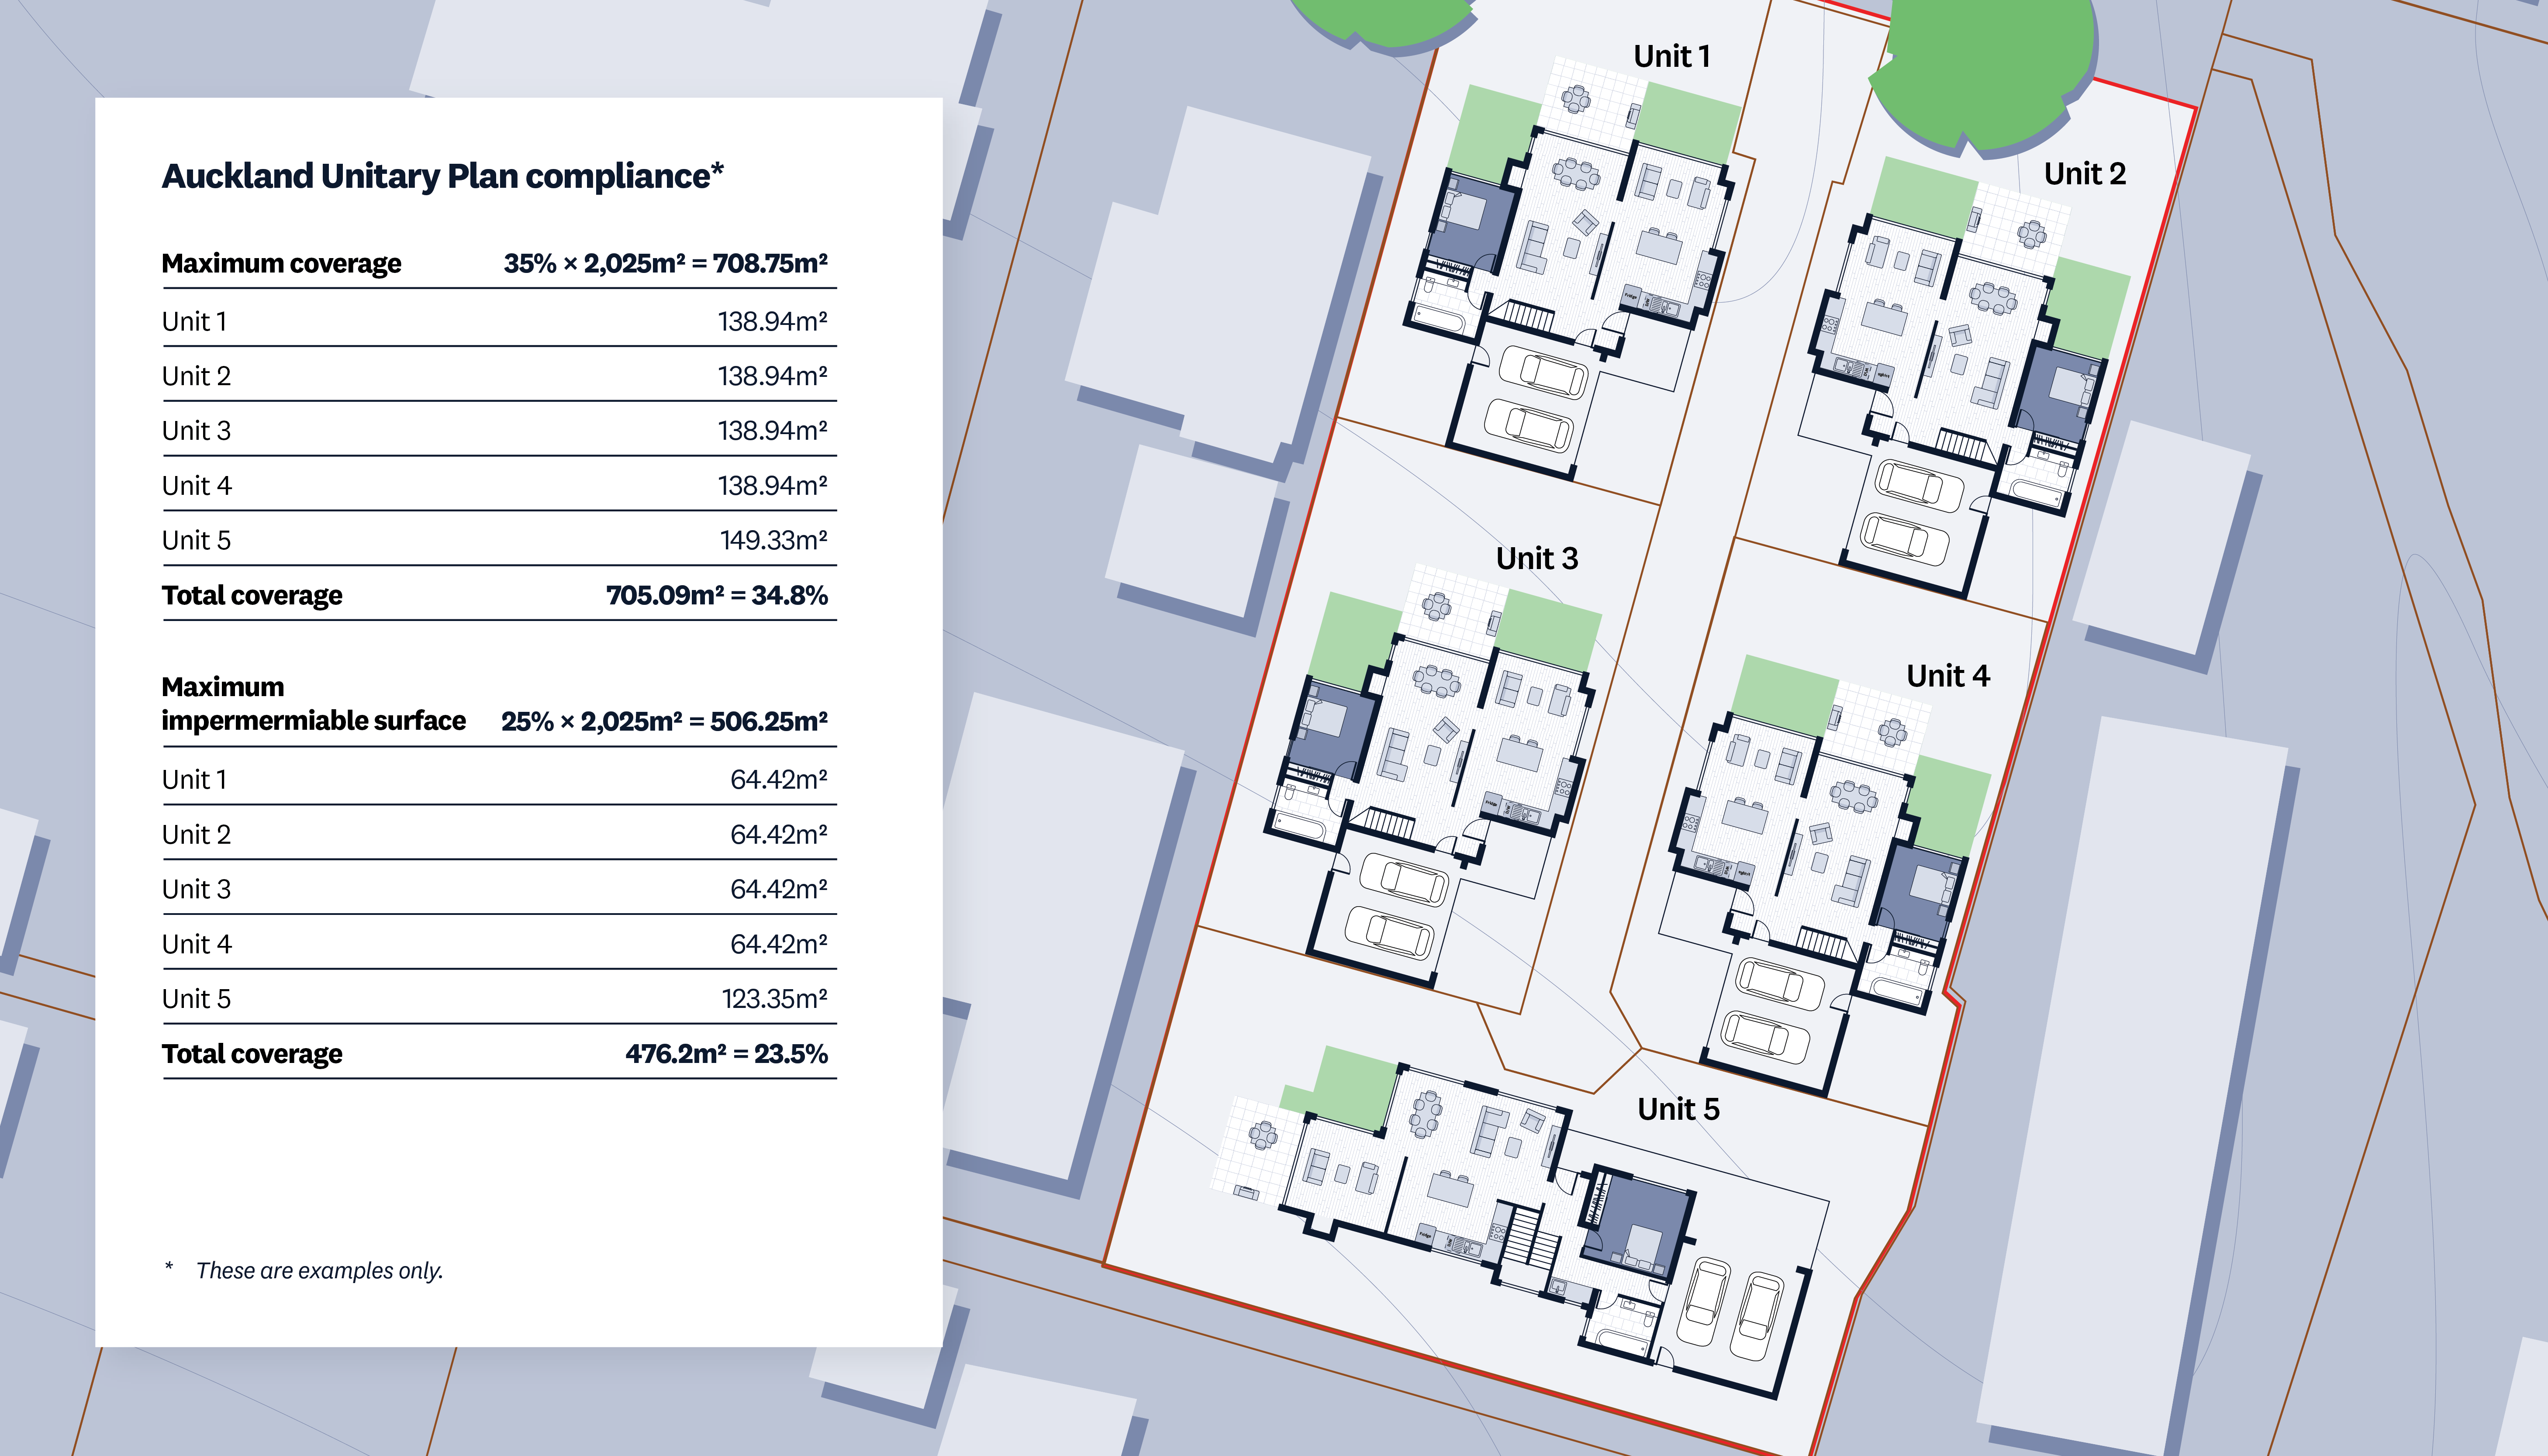
Demonstrate that the appropriate layout and building typology have been chosen for the site and its characteristics.
For subdivision proposals the layout plan should demonstrate:
- The mix of section types and sizes and a mix of uses and activities, to facilitate diversity and adaptability.
- That the lot layout maximises sunshine, views and privacy and creates clear public fronts and private backs.
- Provides convenient access, by foot, to public transport and local open spaces, and limits the use of cul-de-sacs.
- Reduces block sizes as densities and number of residents increases.
To assist with the subdivision design, the Neighbourhood and subdivision design guidance on the ADM should be referred to.
For proposals within centres, the layout plan should demonstrate:
- The existing and proposed active building frontages.
- The areas of existing and proposed public open space, landmarks and gateway locations.
- The visual prominence of the site in the context of the surrounding neighbourhood.
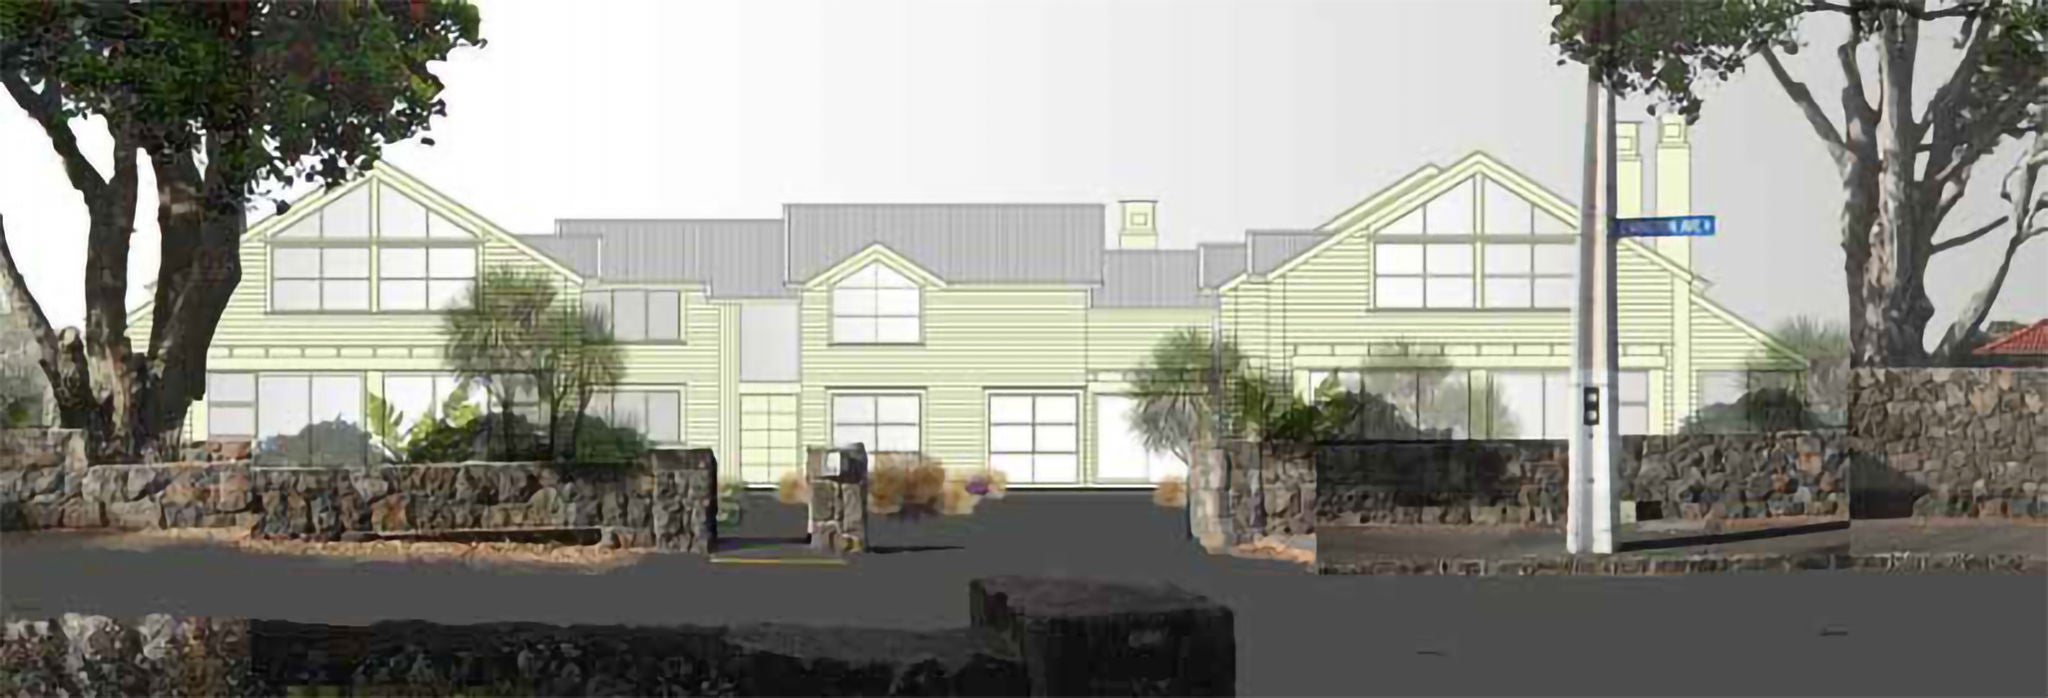
These plans should show how the height, scale, massing, proportions and architectural features of the building(s) respond to the site & surrounds and the future form & quality of the area.
The proposed elevations should:
- Provide the rationale for the proposed scale of buildings in relation to the existing or planned future character of the local area, or where relevant, the opportunities to improve that character.
- Show the appearance of buildings and spaces, how they relate to their surroundings, and how their appearance will support local character and distinctiveness. This does not mean replicating the existing built form but responding in an appropriate way. Any rendered perspectives/computer-generated images must be accurate.
- Demonstrate how all the major design elements of the building(s) have been considered together.
- The general envelope of the building may be defined by development controls, but the form of the building should be considered as an integrated whole.
- Demonstrate the rationale for the building(s) form and elevational treatment including the roof, external walls and elevational features such as doors, windows and detailing. Explain how these elements of appearance will relate to the character of the site’s surroundings.
- Detail how the design of the street frontage will make a positive contribution to the public realm. This includes building setbacks, front yard treatments, fencing, landscaping etc. Demonstrate how the proposed design relates to the street in terms of scale, proportion and rhythm, ground floor articulation and street activation.
- If the immediate area does not present any positive built form elements this does not provide justification for repeating poor outcomes such as a predominance of parking or garages. The proposal should demonstrate that the buildings interact well with the street by encouraging activation and passive surveillance.
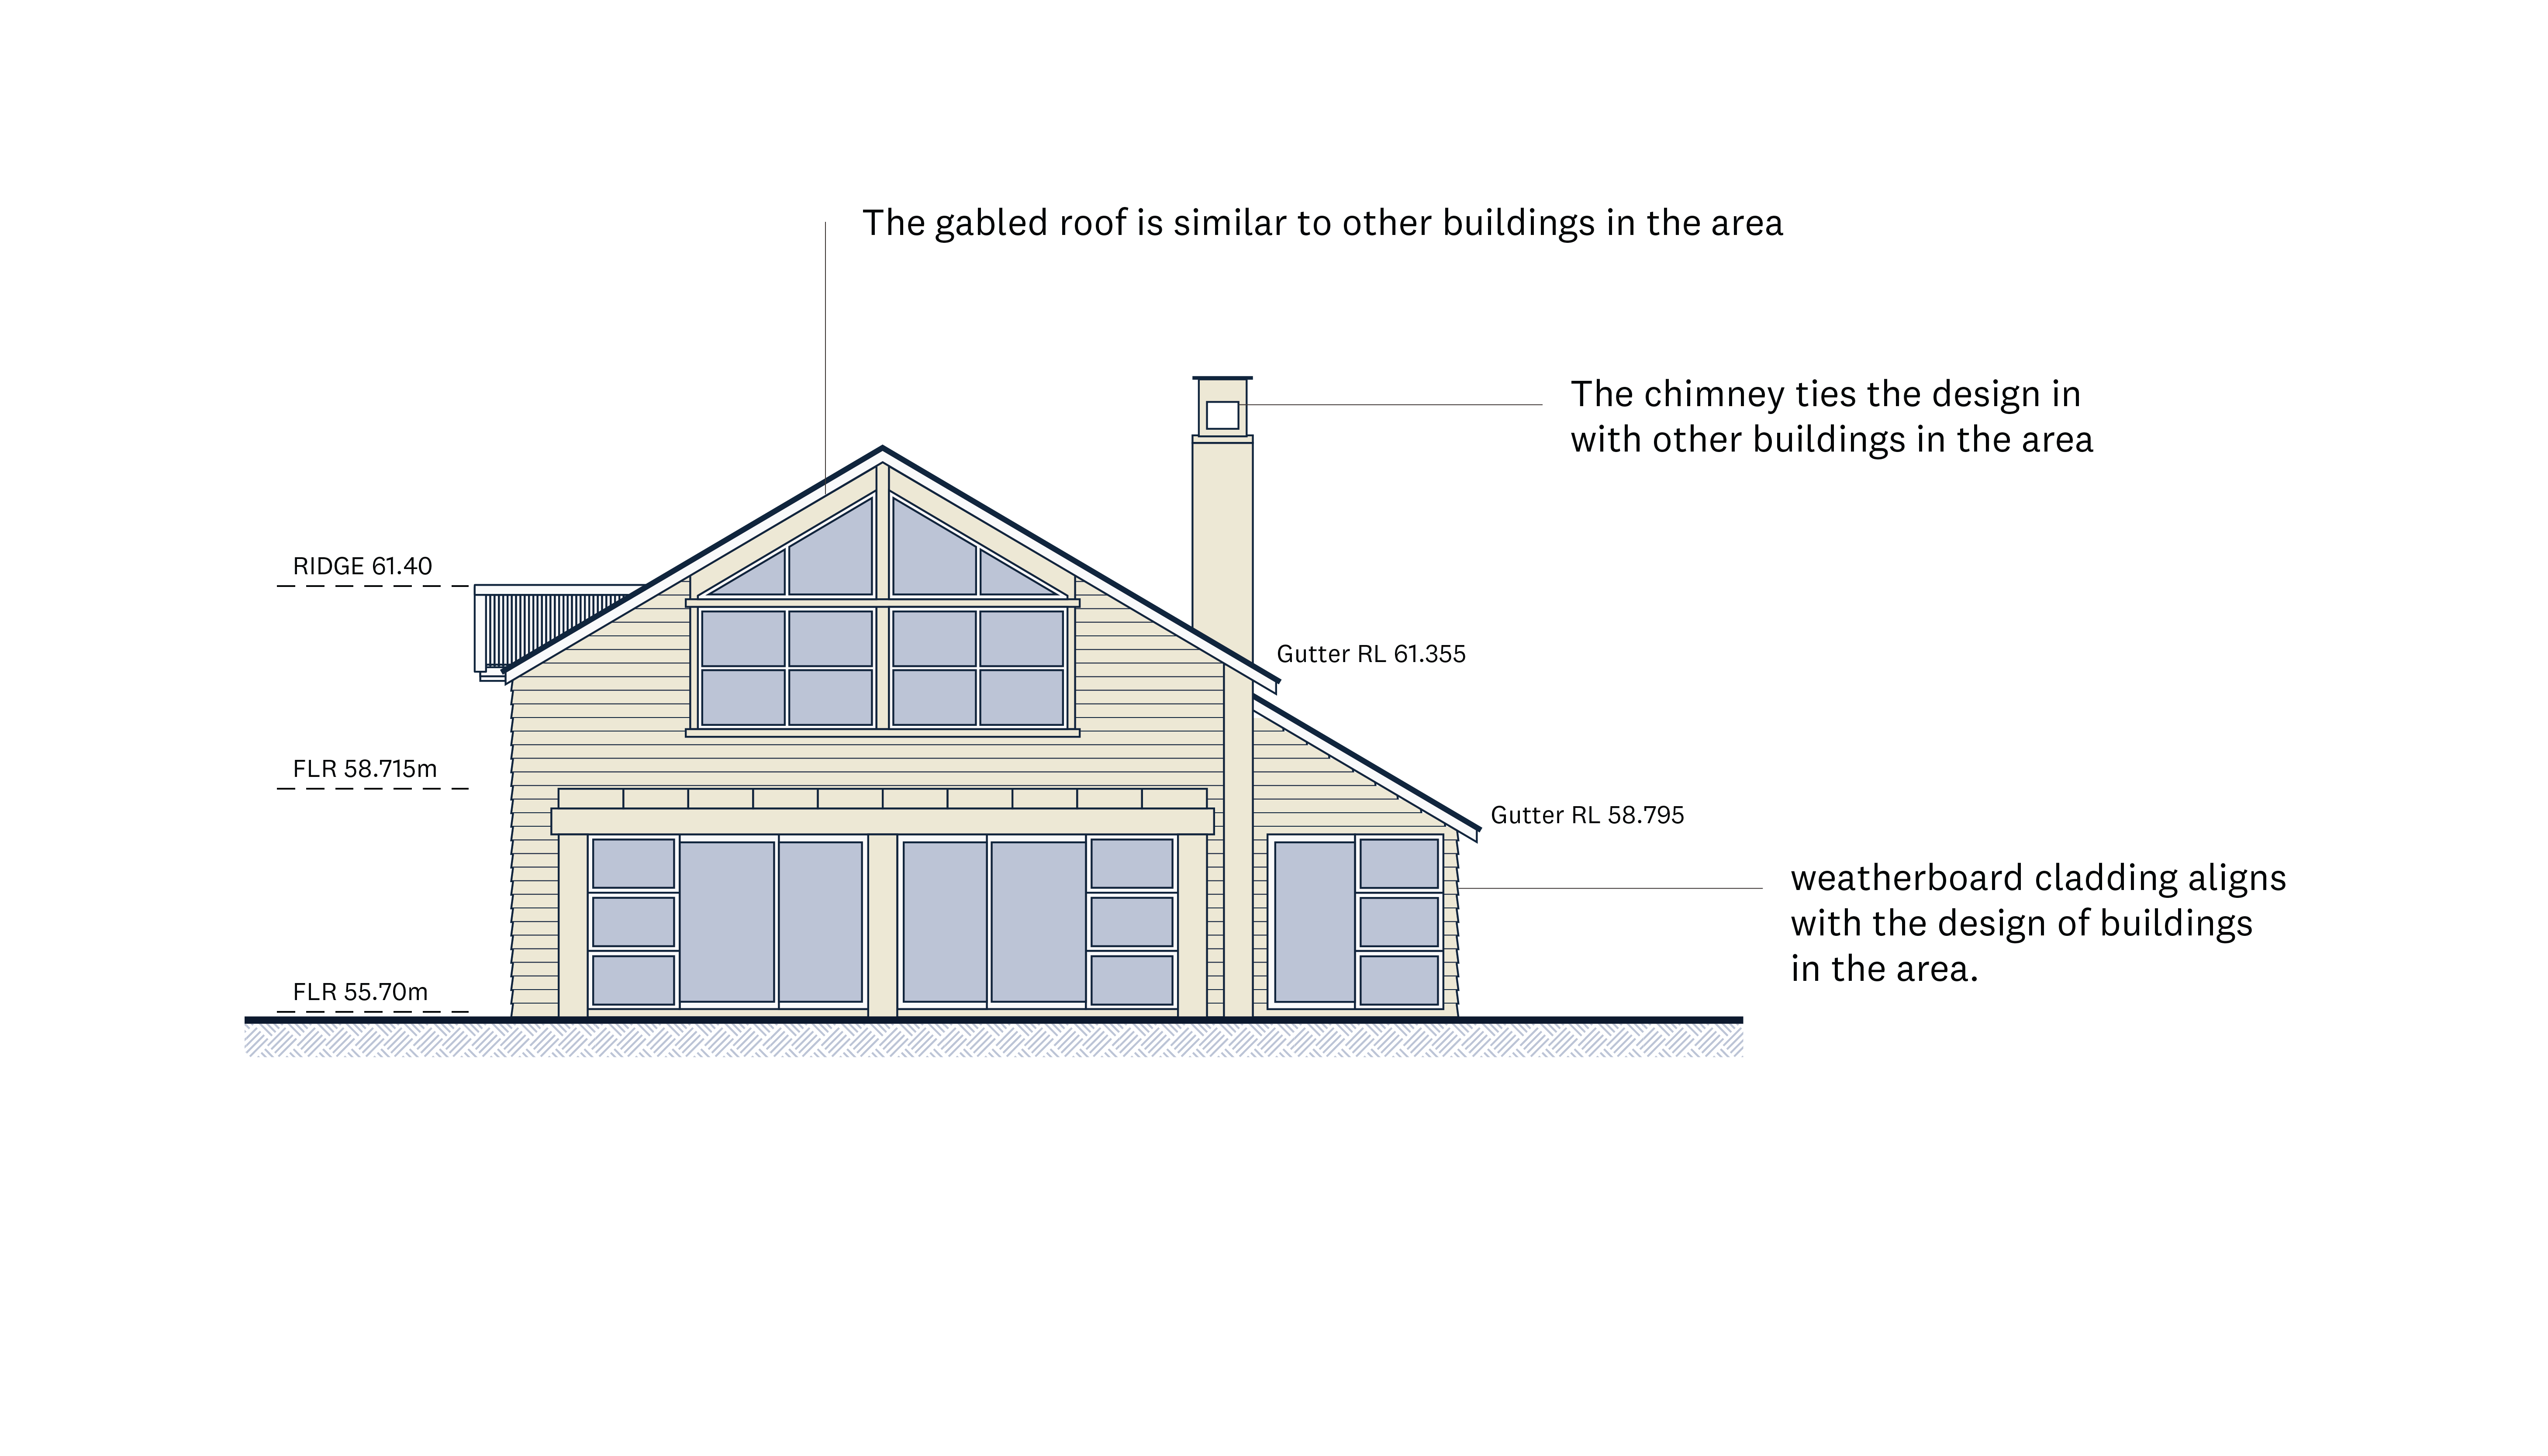
These plans should show the scale, massing, proportions and architectural features of the building.
This should demonstrate how sunlight is to be maintained/provided to private outdoor living spaces or public open spaces within the site and on surrounding sites.
The sunlight access diagram(s) should demonstrate:
- Where there is an infringement of a height limit or a height in relation to boundary control, how the design maintains adequate levels of sunlight access to the affected property/properties.
- Where a residential activity is proposed, a summary of how much sunlight the area will receive during winter.
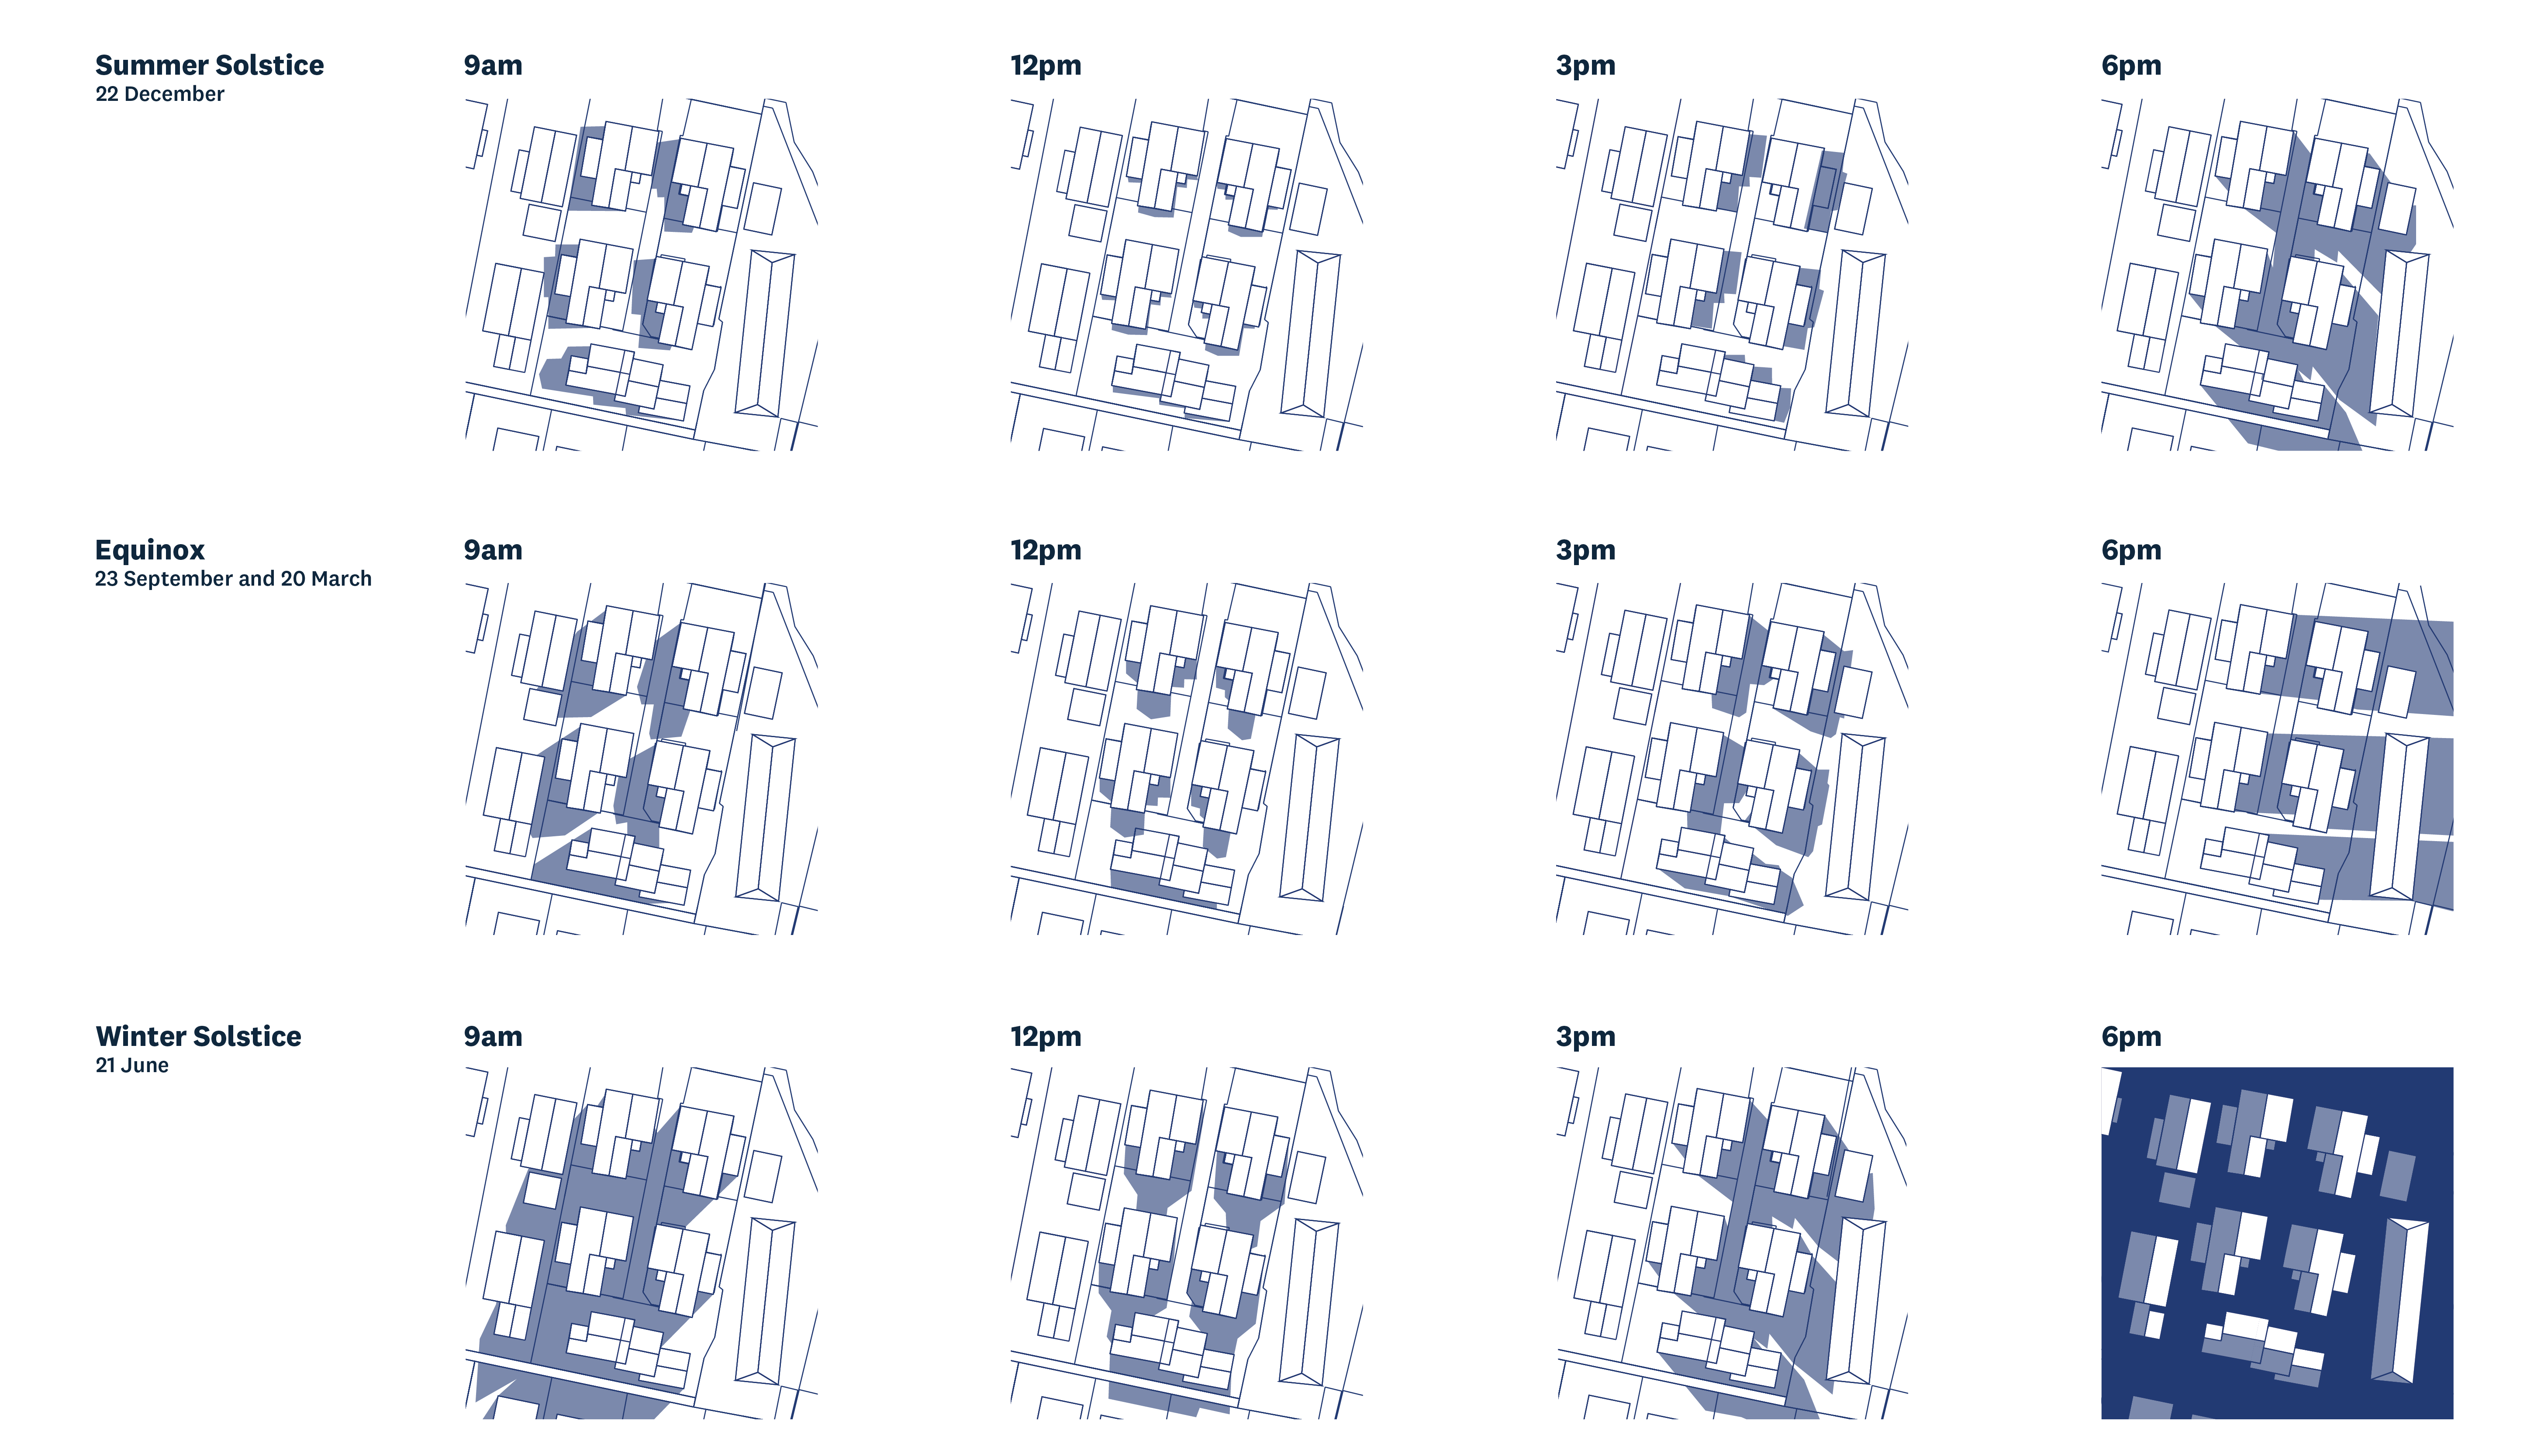
Demonstrate how sunlight access is to be provided to outdoor living spaces and adjacent properties.
The design needs to consider the spatial relationships between built and natural elements to create a high level of amenity for public and private spaces.
The landscape and open space plans should demonstrate how the design:
- Responds to opportunities to improve the landscape character of the site.
- Considers the location, orientation, size, shape and function of private open spaces.
- Provides a high level of amenity to public open spaces including passive surveillance.
- Protects and retains any predominant landscape features including mature trees and significant vegetation.
- Integrates the site with and reflects the valued aspects of the landscape character of the surrounding area, including working with the natural landform to minimise earthworks.
- Integrates the landscape design with the overall site layout and building design and integrates water sensitive design with the landscaping.
- Contributes to local biodiversity, allows for intended vegetation growth and responds to climate conditions.
- Consideration of pedestrian desire lines and access for people of all abilities. Integration with vehicle access and parking.
- Specifies the planting palette (species, density, pot sizes, quantities, height at maturity), layout, edging, mulching, irrigation, drainage, lighting and paving), and considers the ongoing ease and costs of maintenance.
To assist with landscape and open space design the Design guidance section on the ADM should be referred to.
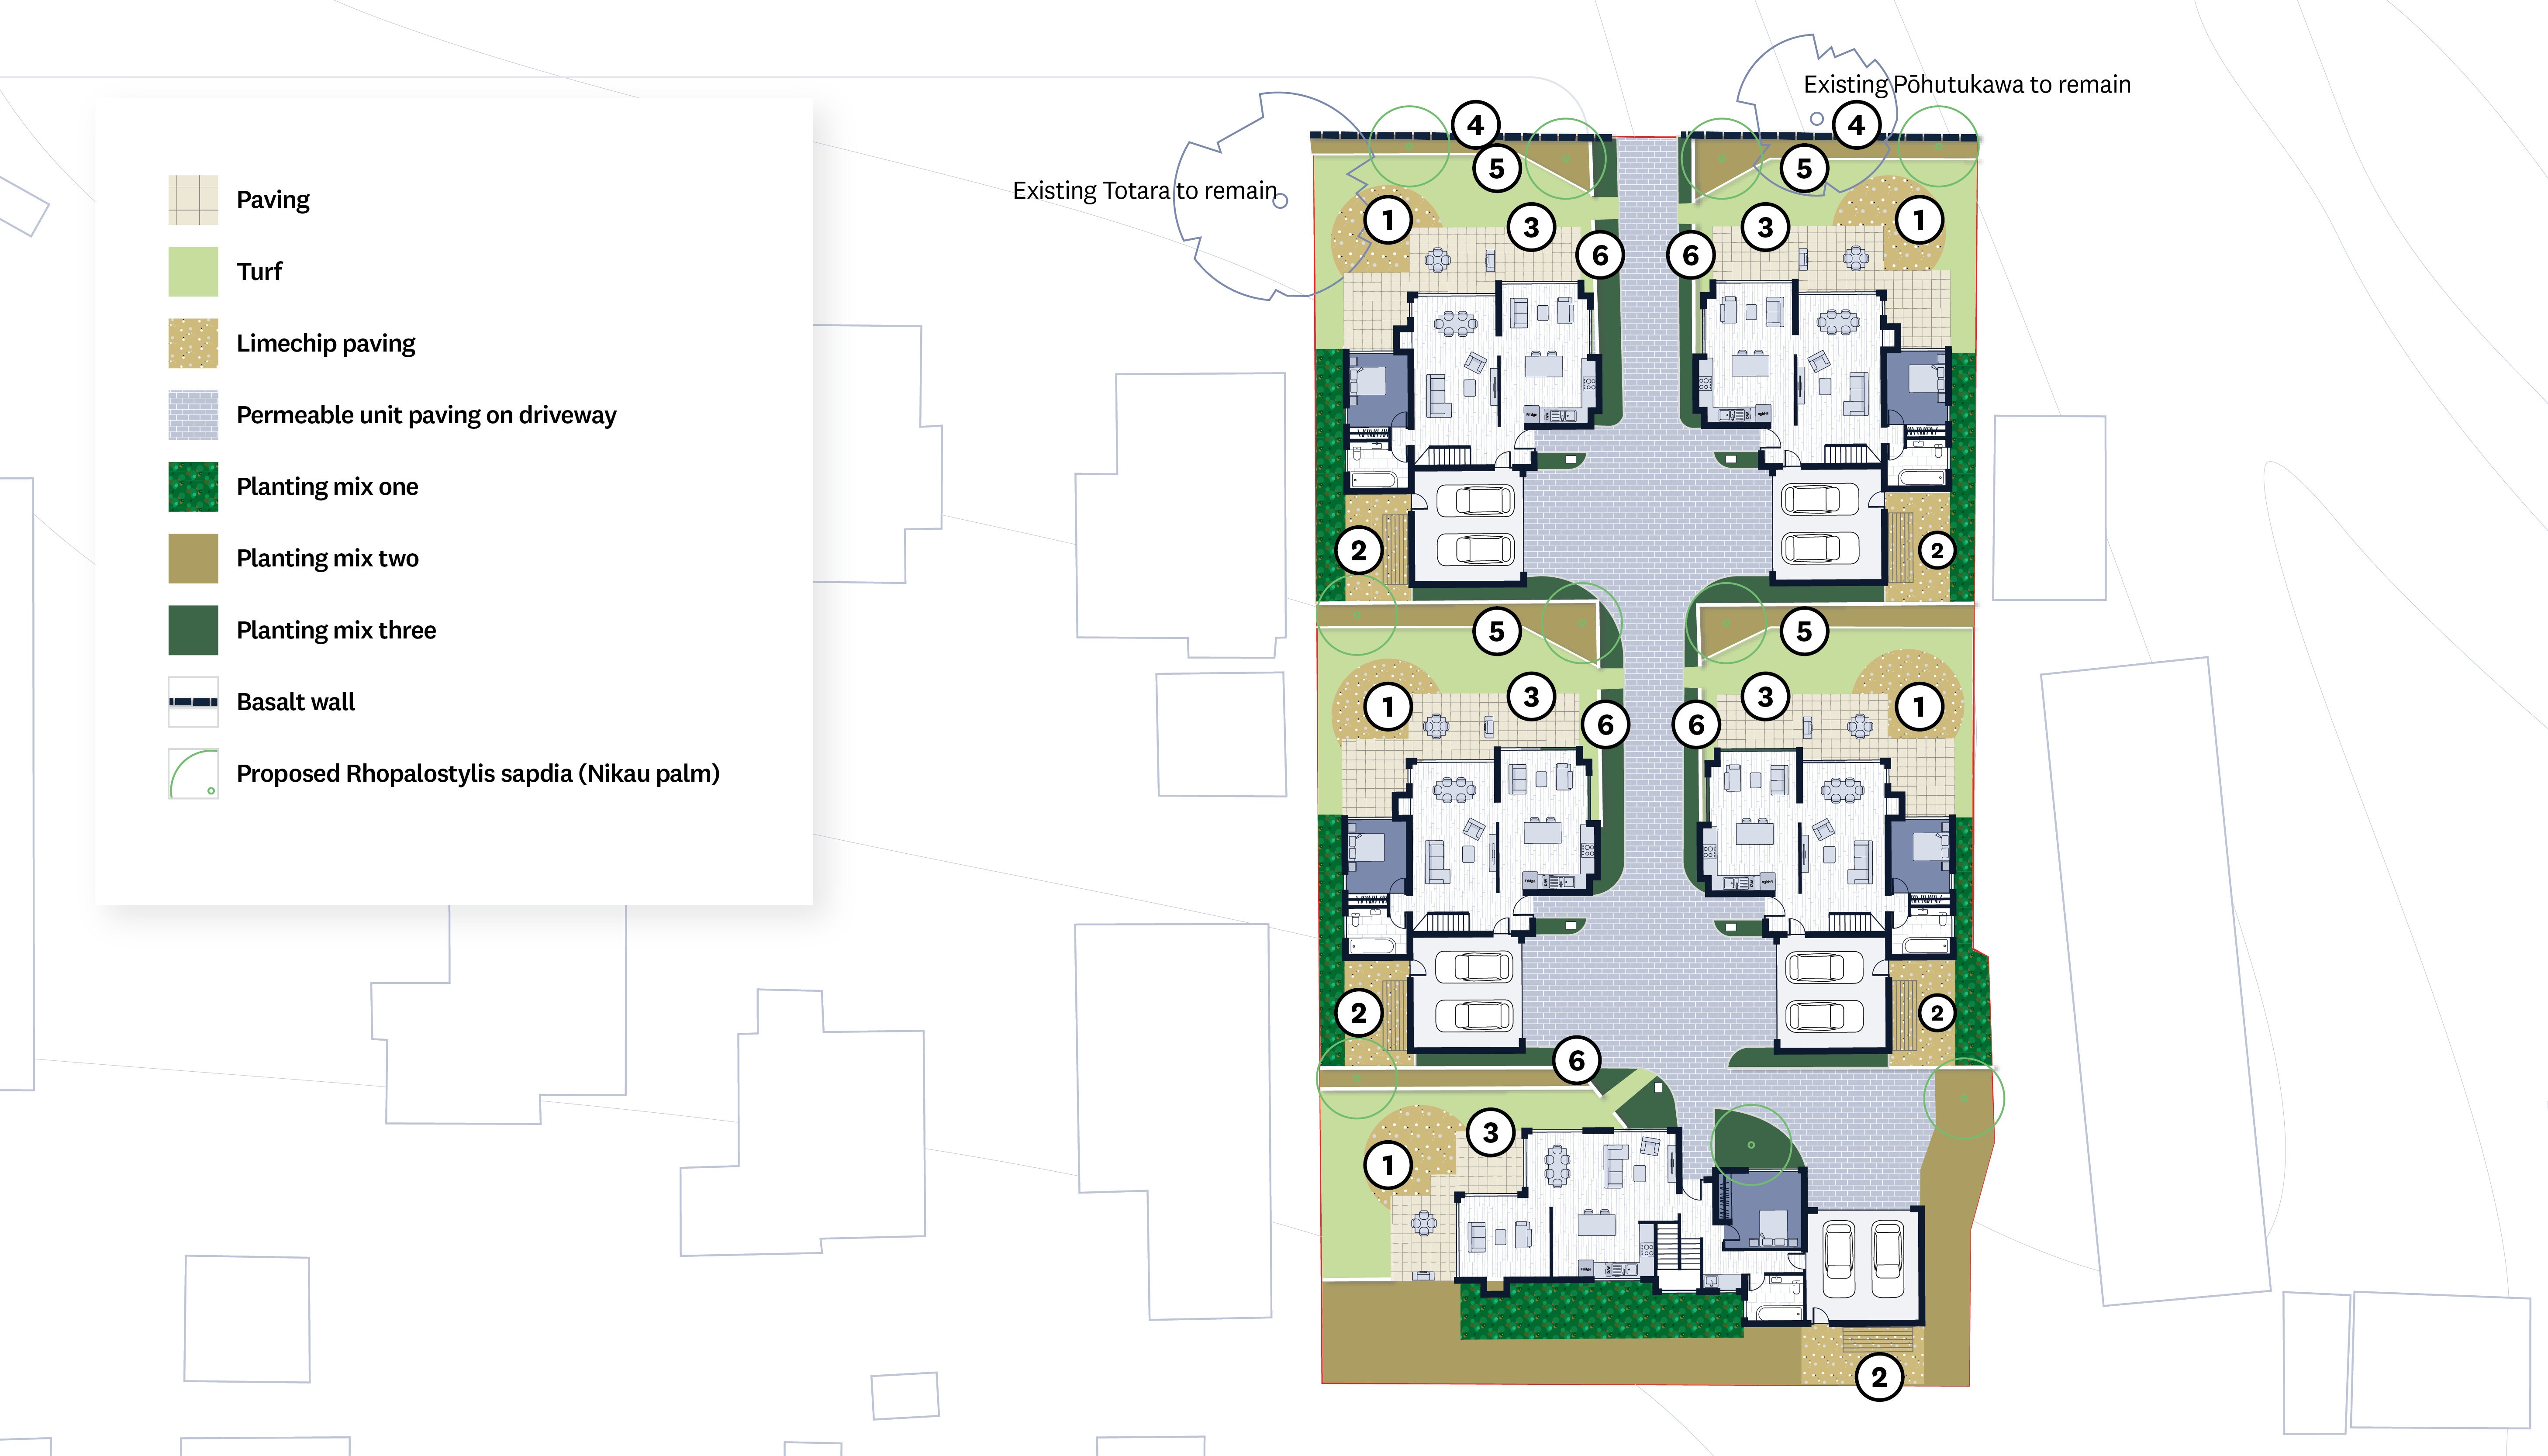
Demonstrate how the design considers the spatial relationship between built and natural elements to create a high level of amenity for public and private spaces.
- Lime chip permeable paved space, for seating
- Lime chip paving for washing line and other utilities
- Proposed paved space, adjacent to building
- 1m basalt wall at entrance
- 0.3m basalt retaining wall for planting bed
- Internal slatted screen fence with gate
The proposed development needs to create legible, attractive, safe and manageable routes that are accessible for all intended users.
The plan(s) should demonstrate how the design:
- Responds to the existing street layout and public transport provision, and why the proposed access points and routes have been chosen.
- Provides for safe pedestrian access, and ensures that people of all physical abilities can get to and move through the development easily and equally.
- Minimises the number of vehicle crossing points, and designs for pedestrian priority.
- Considers refuse collection and other servicing facilities (e.g. letterboxes).
- Integrates secure carpark entries with the overall building design (e.g. use of semi-transparent security gates).
- Avoids creating continuous garage doors along ground floor frontages
For developments with new public or private streets, the plan(s) should demonstrate how the design:
- Creates a clear and consistent road hierarchy that is accessible, legible and safe.
- Mades clear connections to existing routes and facilities.
- Makes it as easy and attractive to walk, cycle or take the bus as it is to travel by car.
- Designs the street cross section to support the adjacent land uses.
A perspective render of a street showcasing its real-life usage and the integration of design elements.
6. Best practice process
A site visit is the first step in preparing a context analysis, understanding the opportunities and constraints, and preparing a development proposal. Seeing and experiencing the site and surroundings is crucial to fully understanding how a development proposal might respond. The design statement documents the site visit process.
When visiting the site, note the following:
- Topography (slope, high points or low points).
- Orientation (where is north, how does the sun pass over the site during the day and where is the prevailing wind from).
- Shading (from neighbouring buildings, trees, landform).
- Existing buildings and structures.
- Existing trees and areas of significant landscaping.
- Any water bodies, including overland flow paths.
- Significant views from the site (also consider any significant views to the site).
- Boundary treatment (clear demarcation, fencing, vegetation).
- Access (driveways, footpaths).
- Buildings and activities on neighbouring sites, including the location of private outdoor spaces for residential activities.
- Any significant (positive) characteristics of surrounding buildings along the street (architectural character, common setbacks, predominant heights, building bulk etc.)
- Level of activity (including traffic and noise) on the street and surrounding sites.
Ideally visit the site several times and at different times of the day, night and week to observe changes.
There is now a wide range of online sources available for finding information on your site and surrounding context. It should be noted that these should not be relied upon to replace a site visit. Often the online information is no longer current. For example, Google Streetview is often only updated over several years, and new developments are therefore not shown.
Use pre-application meetings to agree both the level of information and analysis required and what the critical issues are that the development proposal will need to respond to are.
Pre-application meetings provide a valuable opportunity to discuss and agree the design statement requirements for the particular proposal and provide an initial response to the main issues raised by the proposal.
Pre-application meetings are an effective way to ensure the quality and comprehensiveness of a consent application, which should lead to efficient processing, with reduced likelihood of rejection or further information requests.
At the initial pre-application meeting the draft site and neighbourhood analysis, planning context and an opportunities and constraints analysis should be presented for discussion. Based on this, council officers will give guidance on any further information required, and the key issues for consideration. The concept design and key design principles in response to the issues and opportunities identified can then be considered.
Working with the council throughout the pre-application process will avoid delays caused by insufficient information and help to focus on the matters most important to the success of the development.
The design statement should be presented as a single package of information, rather than scattered throughout the resource consent application.
Presenting information
Try to present the information clearly and concisely by keeping text brief, as supporting photographs, diagrams, drawings and maps will help illustrate key points.
Ensure the formality of drawings is relative to the complexity of your site and development proposal. For some sites and development proposals, hand drawn plans and analysis may be appropriate. Where appropriate, use the same base map for all diagrams, to help with consistency.
Drawing guidelines
Good quality drawings are important to producing a high-quality design statement that communicates the design process and development proposal clearly and effectively. Improve the usefulness of the drawings by:
- Always showing site boundaries, neighbouring buildings, a north arrow, a scale bar and scale at specific paper size, a drawing name and key.
- Using a key to explain any symbols or colours used in drawings.
- Limiting how much text is added to a drawing with careful and concise annotations, so as not to complicate or cover the image beneath.
- Not putting too much information on one drawing. If a drawing is becoming crowded, split the information over two drawings instead.
- Using colours or patterns that can easily be reproduced in black and white, so that detail is not lost if copied in black and white only.